Support

/

Getting Started

Three steps to a successful rollout.

How do I get started?

  1. Get your students in. Find the rostering and login instructions that fit your setup — Clever, ClassLink, Schoology, or a manual import.
  2. Open your reports and click the “Success” button. That walks you through the keys to getting real results with the program — it is the single most useful five minutes you can spend here.
  3. Watch a Quick Start video. Start with the 9-Minute Quick Start, then come back for the full training when you have time.

Quick Start videos

Skip the lengthy training sessions. Our Quick Start videos will have you and your students up and running fast. Watch them at your own pace, share them with your team, and revisit anytime.

These are the same videos as on the home page.
Rostering & login

Pick the system your district already uses.

Clever

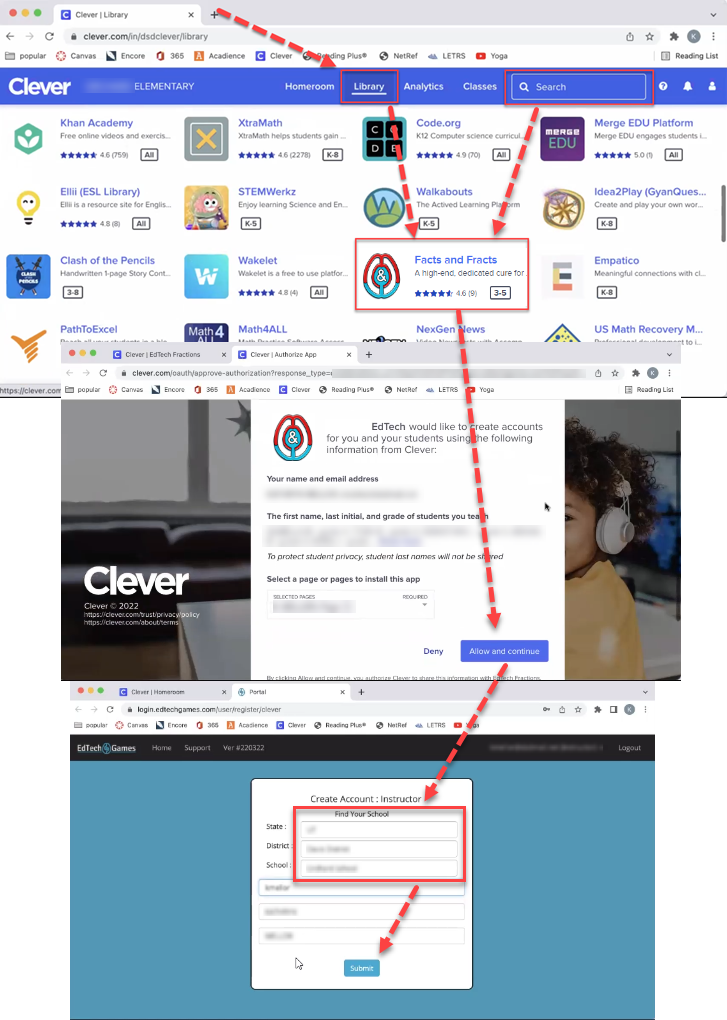
  1. Open the “Library” and search for and install “Facts and Fracts.”
  2. Choose “Install,” then “Allow and Continue.”
  3. Choose your State, District and School. If you do not find your school, do not proceed — email support@edtechgames.com.
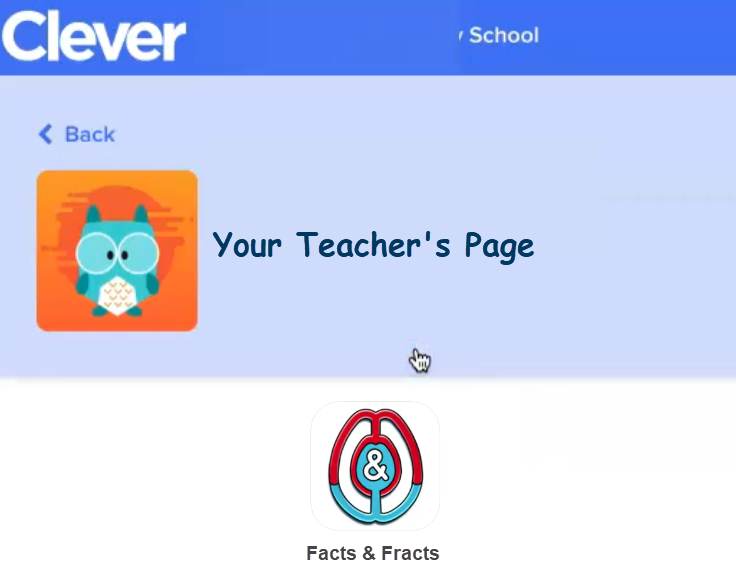
  4. Launch “Facts and Fracts” from the Teacher Page you added it to. SSO logs you straight in.
  5. Students must go to that same Teacher Page and launch it from there.

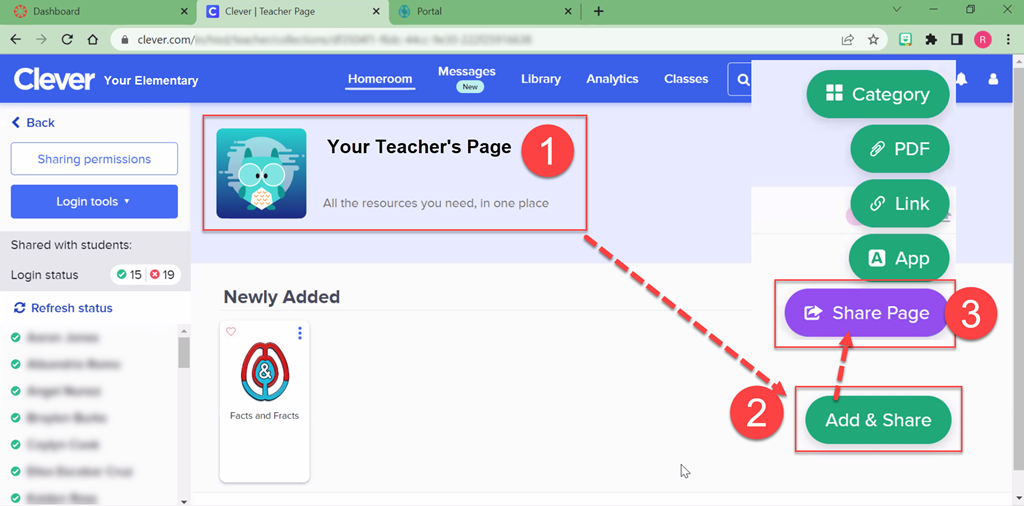
You must “Share Page” or students cannot reach the app.

Installation puts the app on your Teacher Page, and teachers and students are often unfamiliar with that page. In most cases it was shared long ago, but occasionally it has not happened yet.

Clever Library installation

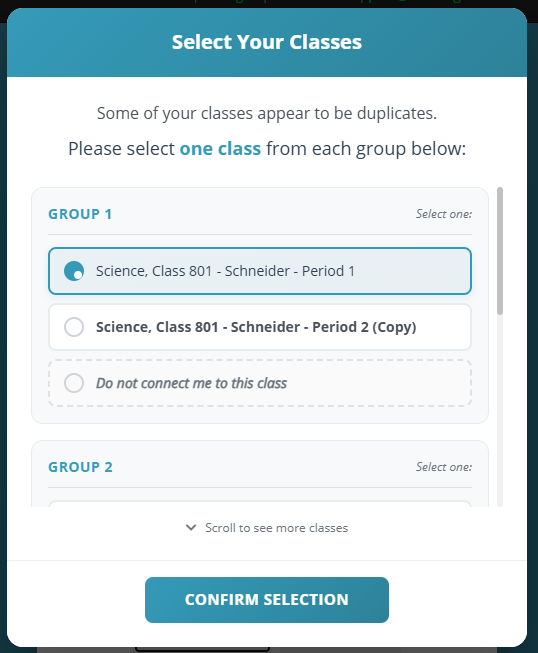
Select ONE copy of each class you want connected. The system walks you through this:

Clever class selection How to share your Teacher Page in Clever

Schoology

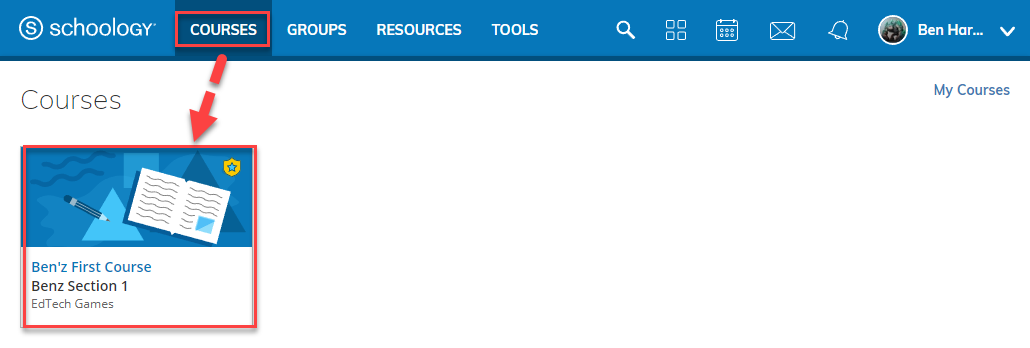
  1. You must have at least one Course created. Select the Course you want. Schoology: select a course
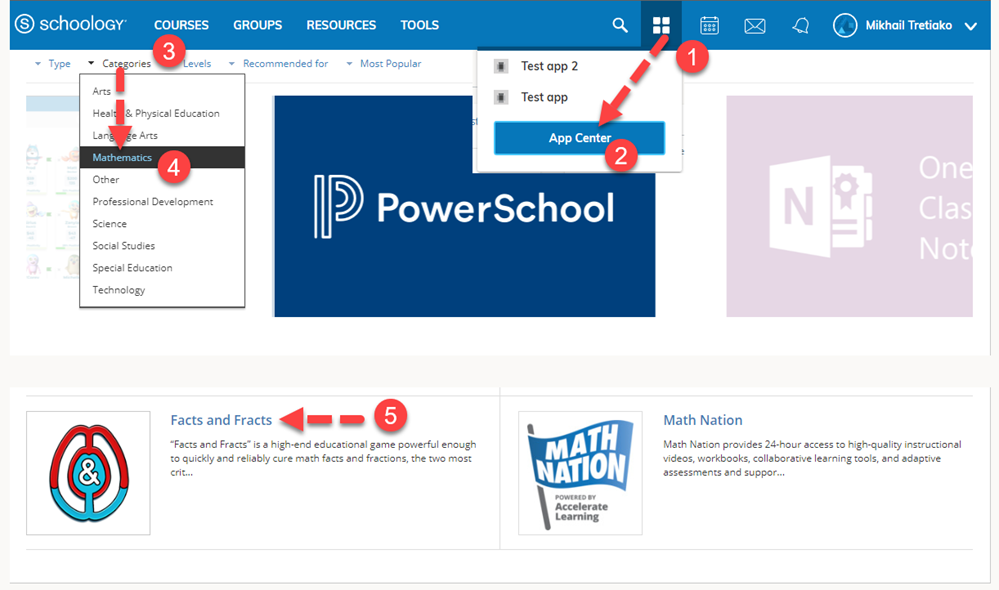
  2. Open the App Center, choose the “Mathematics” category, and select “Facts and Fracts.” Schoology App Center
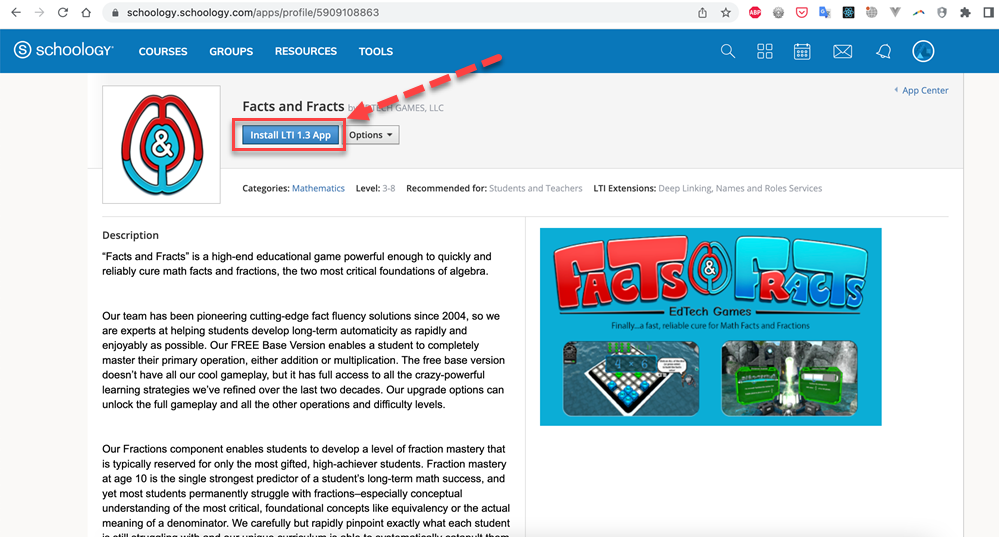
  3. Install the Facts and Fracts LTI 1.3 app. Install the LTI 1.3 app
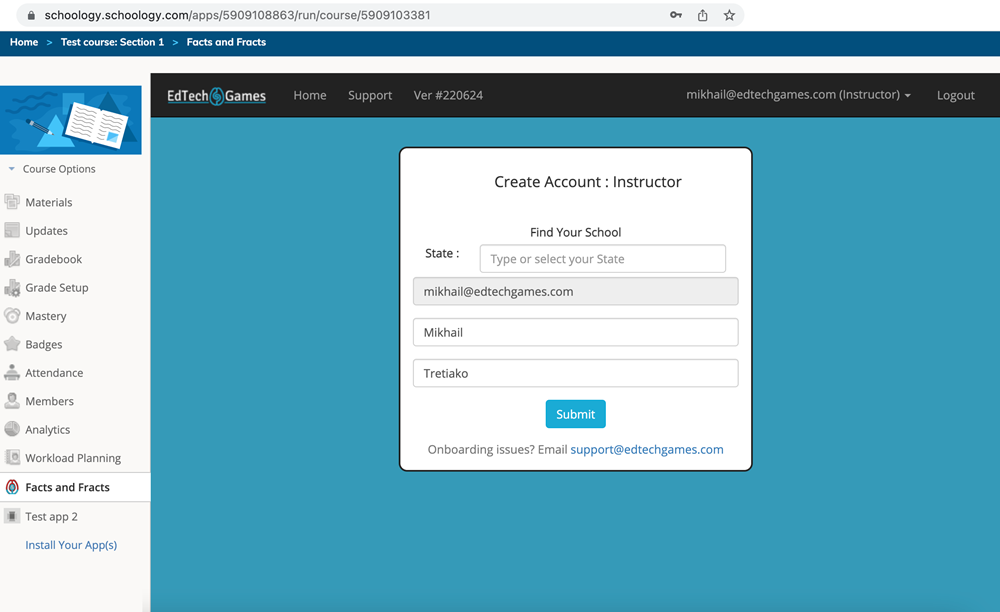
  4. The first screen pre-populates your information. Schoology install panel 1
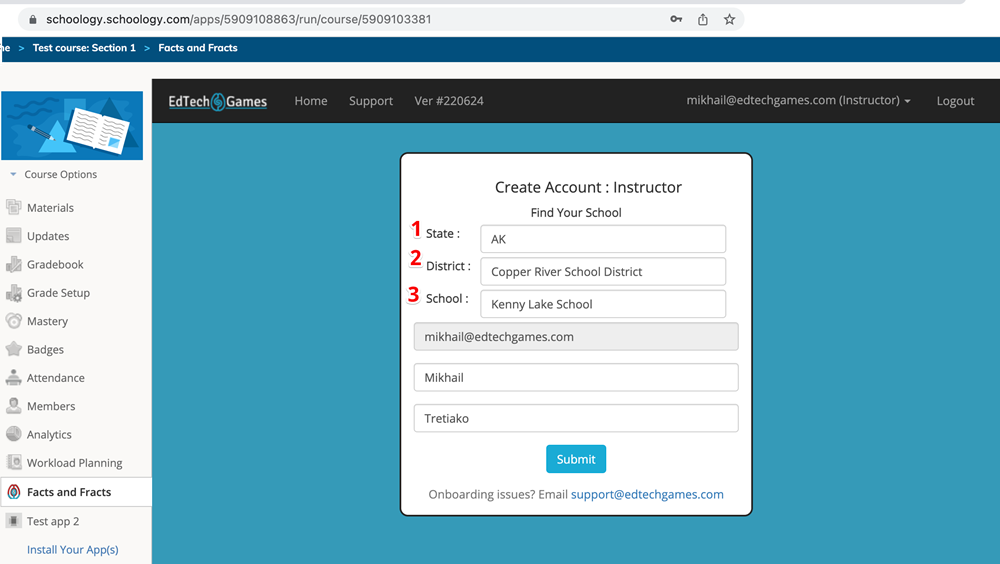
  5. Select your State, District and School, then press Submit. Schoology install: select school
  6. Onboarding starts. If you have duplicate classes it helps you keep only one copy of each — most teachers have the same students in a Math class, a Science class and a Homeroom.
  7. Do not skip this step. When onboarding finishes, launch “Facts and Fracts.” That is the step that actually imports your students.
  8. SSO logs you straight in from then on.

ClassLink — for teachers Teacher

If your district has already added Facts & Fracts, there is nothing for you to install.

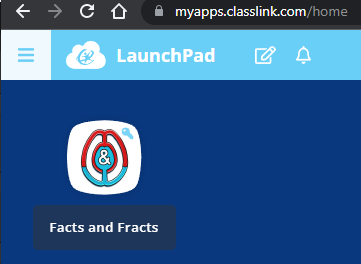
  1. Open your ClassLink LaunchPad.
  2. Launch Facts and Fracts. SSO logs you straight in.
ClassLink icon example

No icon on your LaunchPad? Your district has not added us yet. Send them ClassLink — for districts.

ClassLink — for districts District IT

Two things have to happen, and they live in two different ClassLink tools. Do both.

Login without rosters means students arrive to an empty account. Rosters without login means nobody can get in. You need both.

Part 1 — Put Facts & Fracts on LaunchPad (CMC)

  1. Add the app.

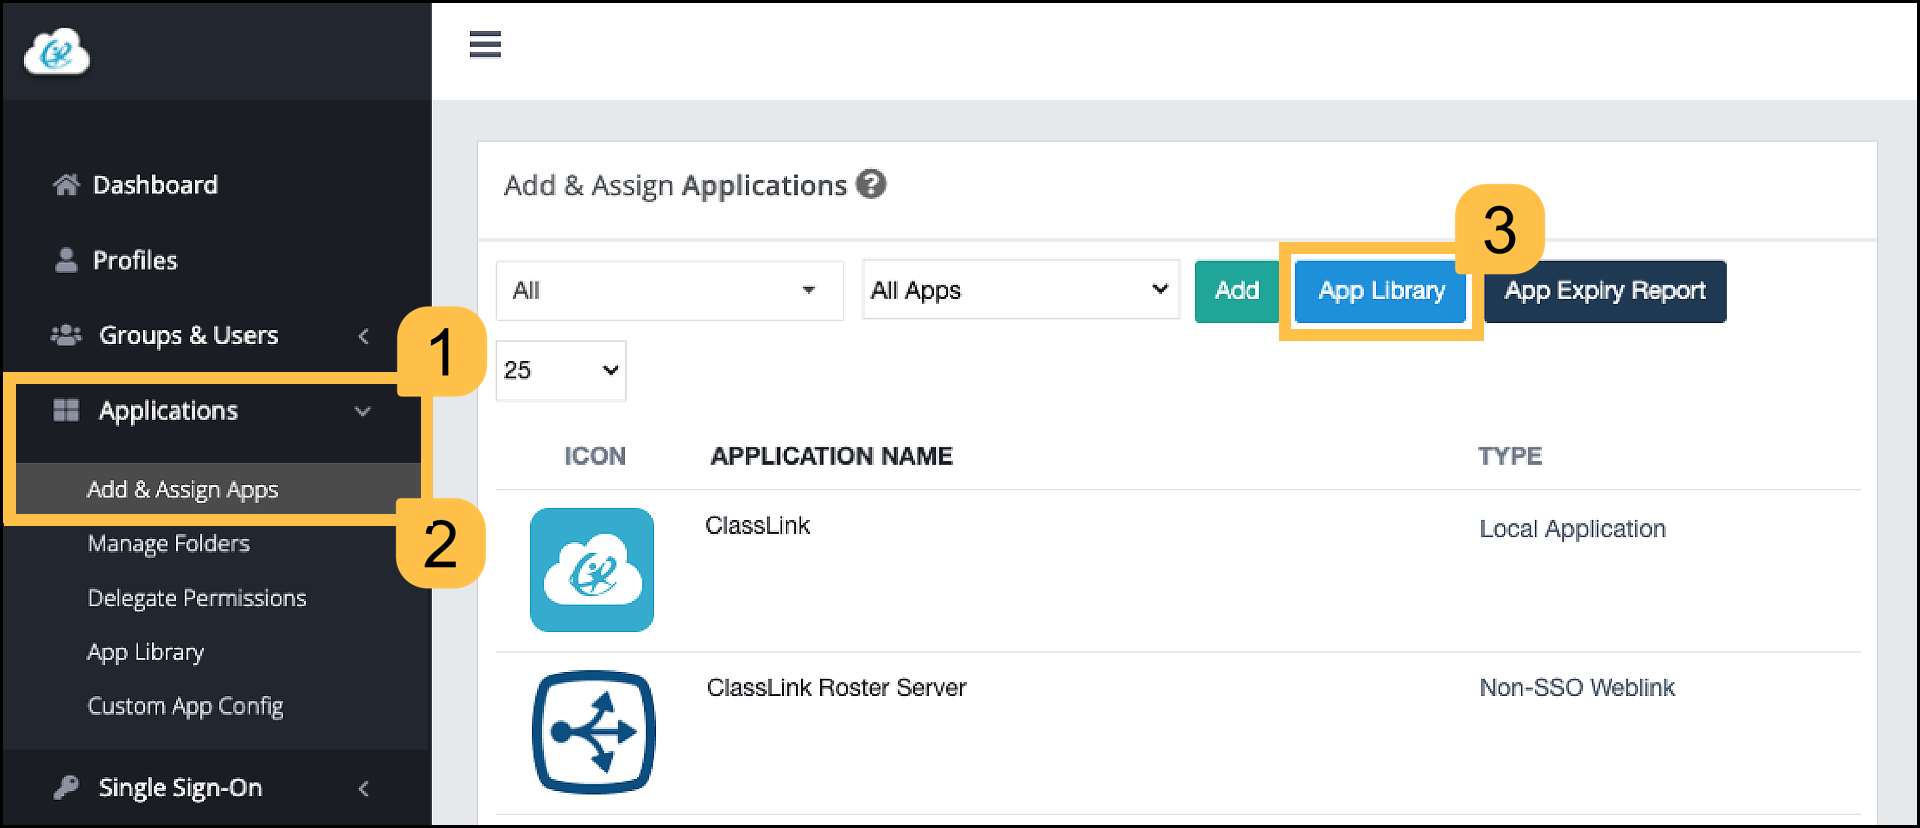
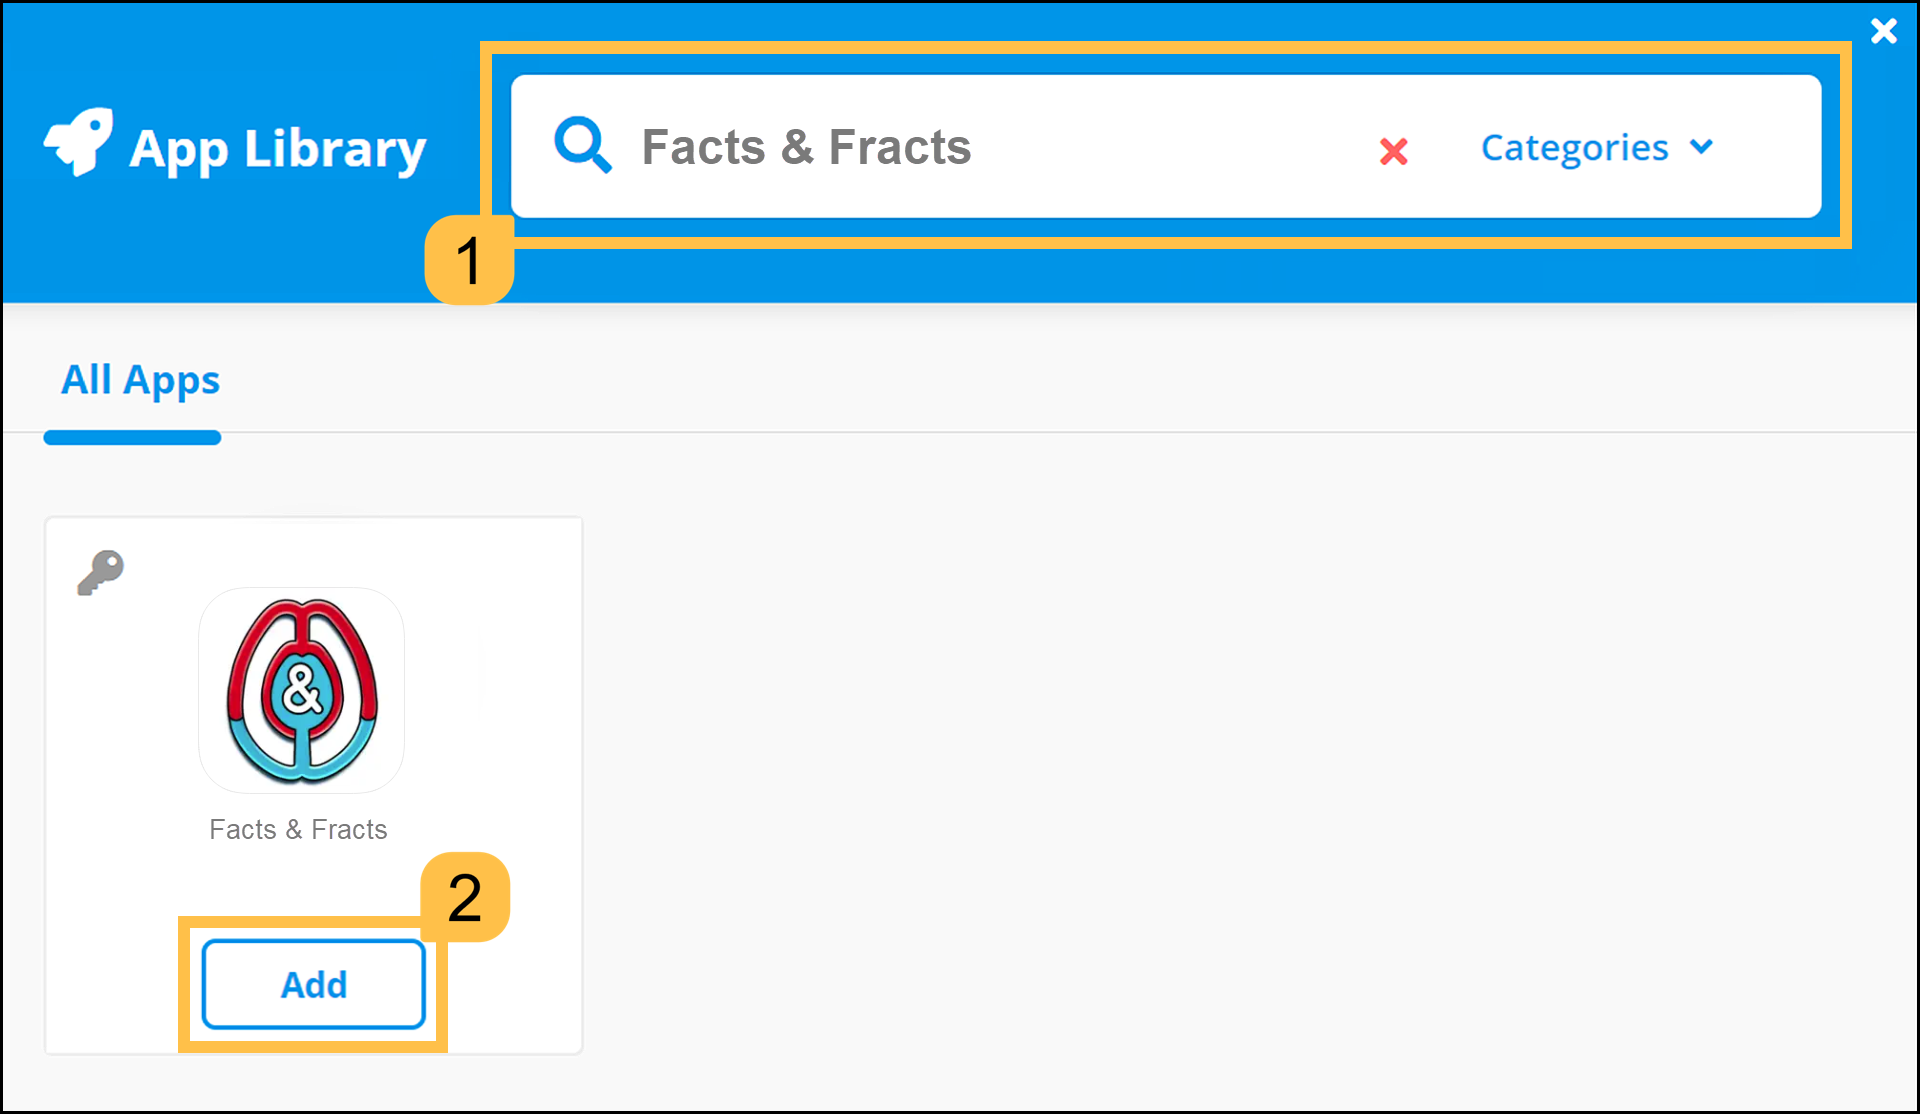
    Go to Applications → Add & Assign Apps, then click App Library. Search for Facts & Fracts, click Add, then close the slide-over. The app now appears in your application list.

    If you come across the name EdTech Fractions - prod anywhere during setup, that is us. It is the internal name of our OAuth login connection — not a different app.

    ClassLink CMC: Applications, Add and Assign Apps, App Library ClassLink App Library slide-over: search for the app and click Add
  2. Decide who gets it.

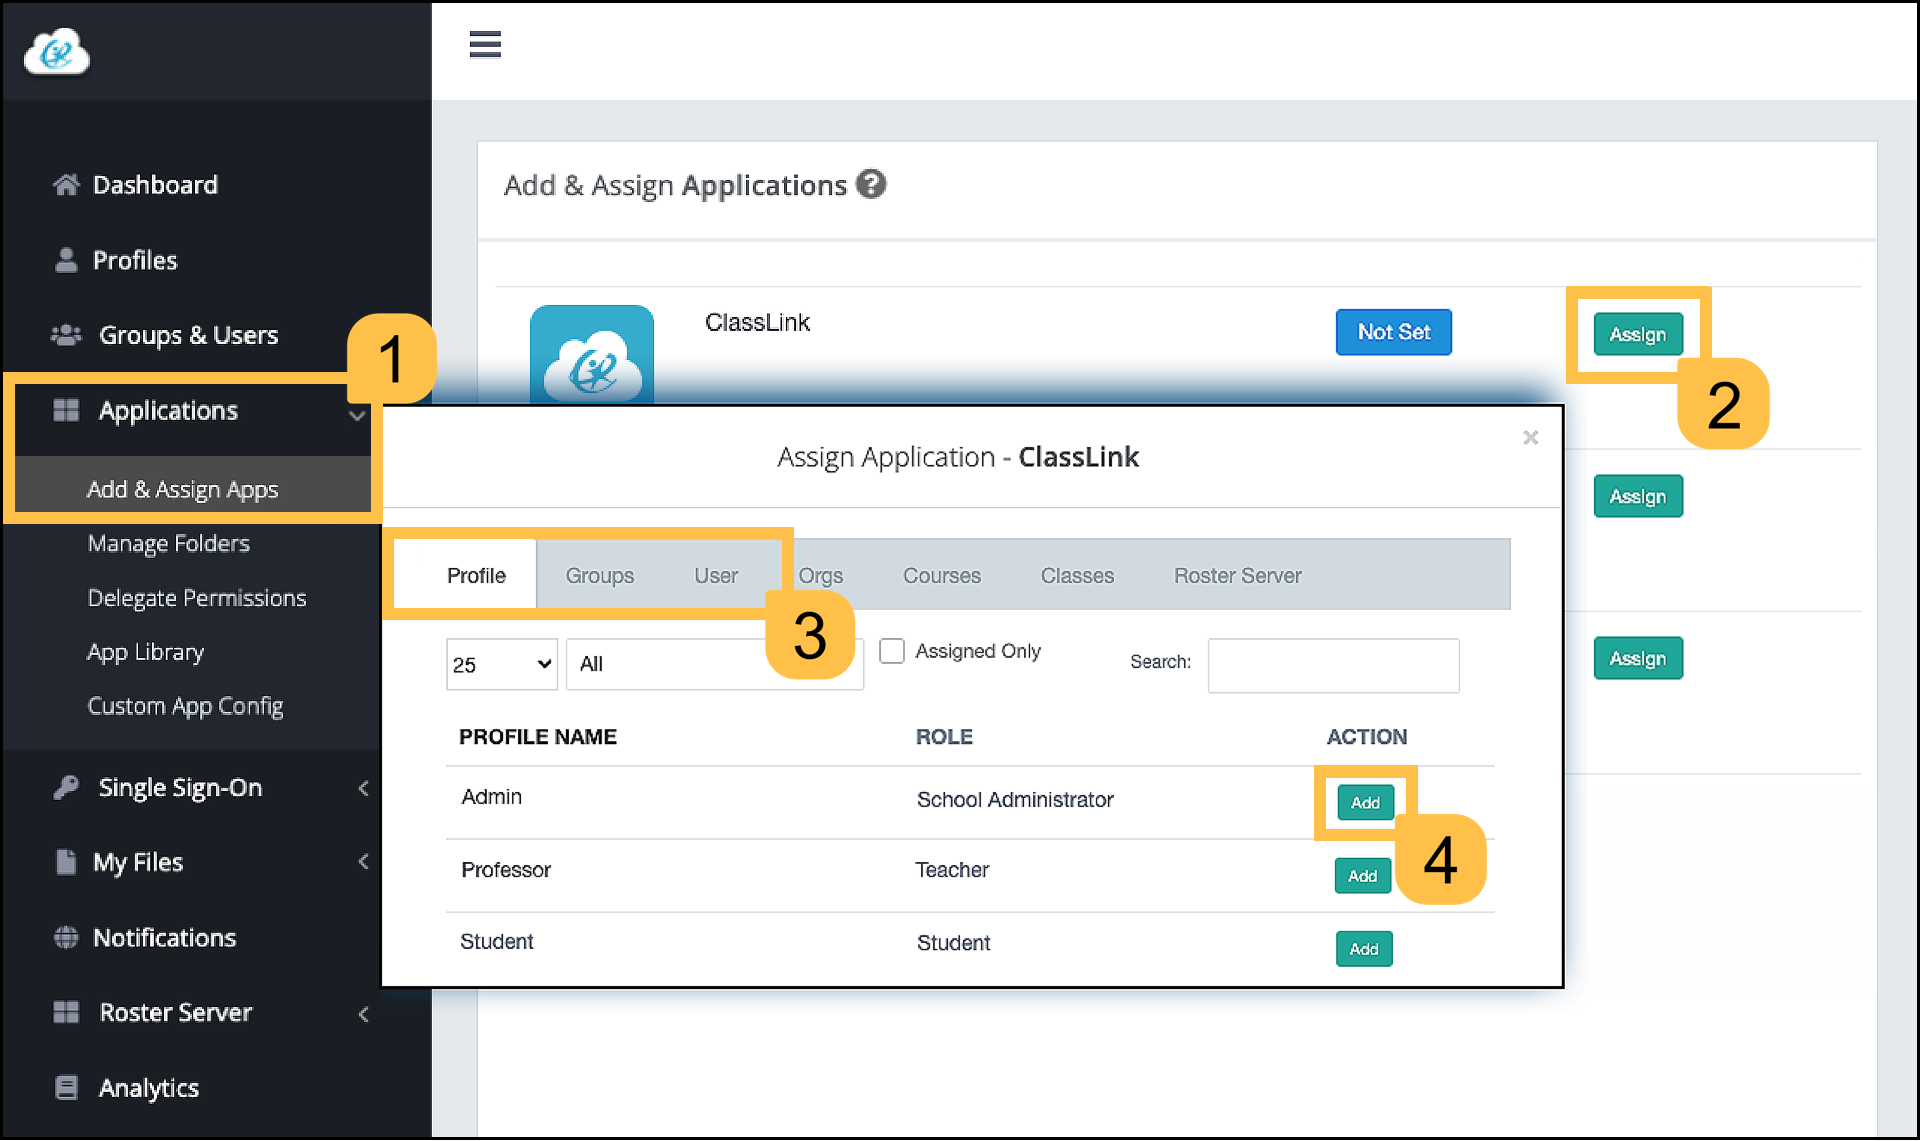
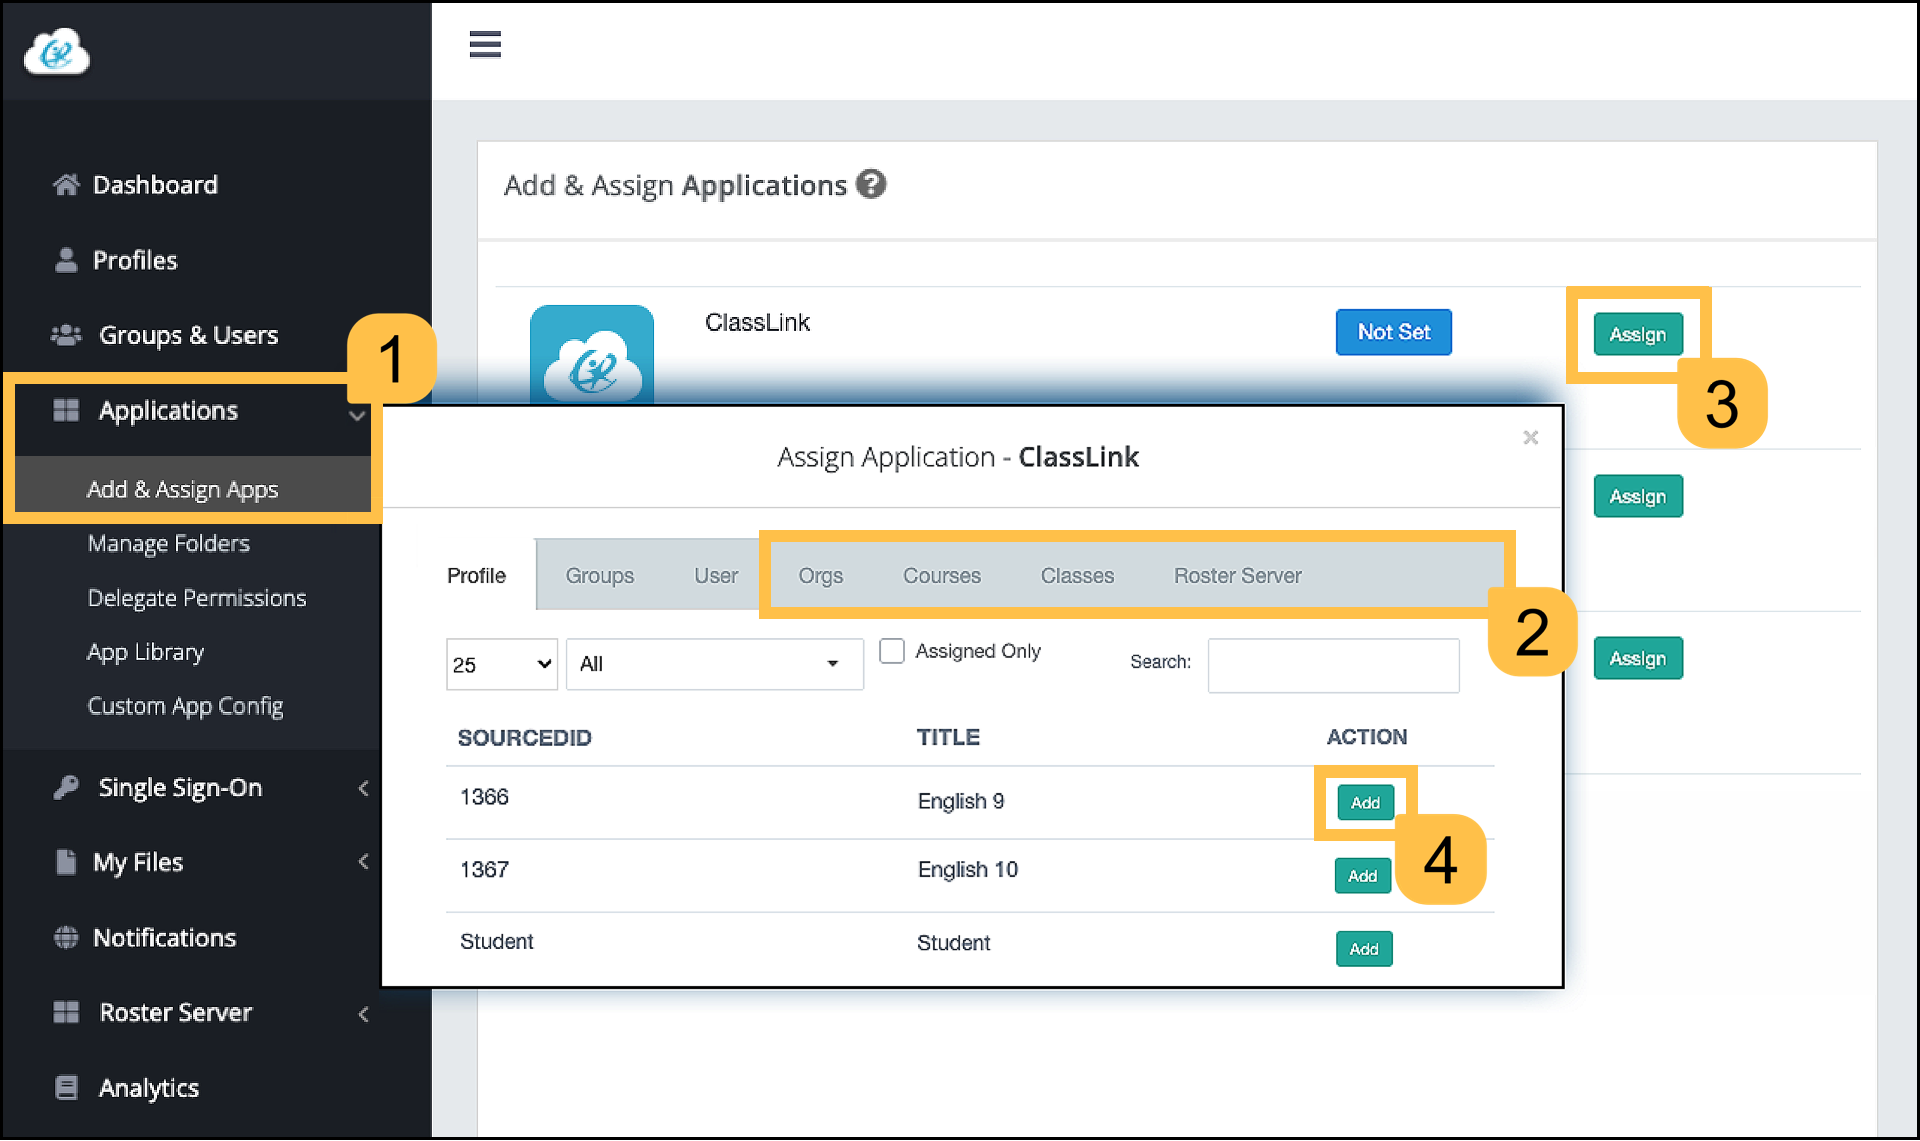
    Go back to Applications → Add & Assign Apps, find Facts & Fracts, and click Assign.

    You will see a row of tabs. They are just two different ways of answering one question — who should see this icon?

    • Profile, Groups, User — go by who someone is in ClassLink. For example, everyone with the Student role, all Teachers, or a group you maintain such as “Lincoln Elementary.”
    • Orgs, Courses, Classes, Roster Server — go by your SIS roster. For example, only the three schools running Facts & Fracts, or specific classes.

    Which should you pick?

    • Whole schools are using it → use Orgs and select those schools. Least ongoing maintenance.
    • Rolling out district-wide → use Profile and assign to Student and Teacher. Fastest.
    • Only use Courses or Classes if you truly need that much precision — those change every year, so you will have to redo it annually.
    Assigning by Profile, Groups or User Assigning by Orgs, Courses, Classes or Roster Server

Two things to know. The Orgs / Courses / Classes tabs only work if Roster Server is connected.

New assignments appear on LaunchPad after the nightly sync (2:00 a.m. UTC) rather than immediately. If you do not see the icon right away, check again the next morning.

Part 2 — Connect us to your roster (Roster Server)

  1. Add us.

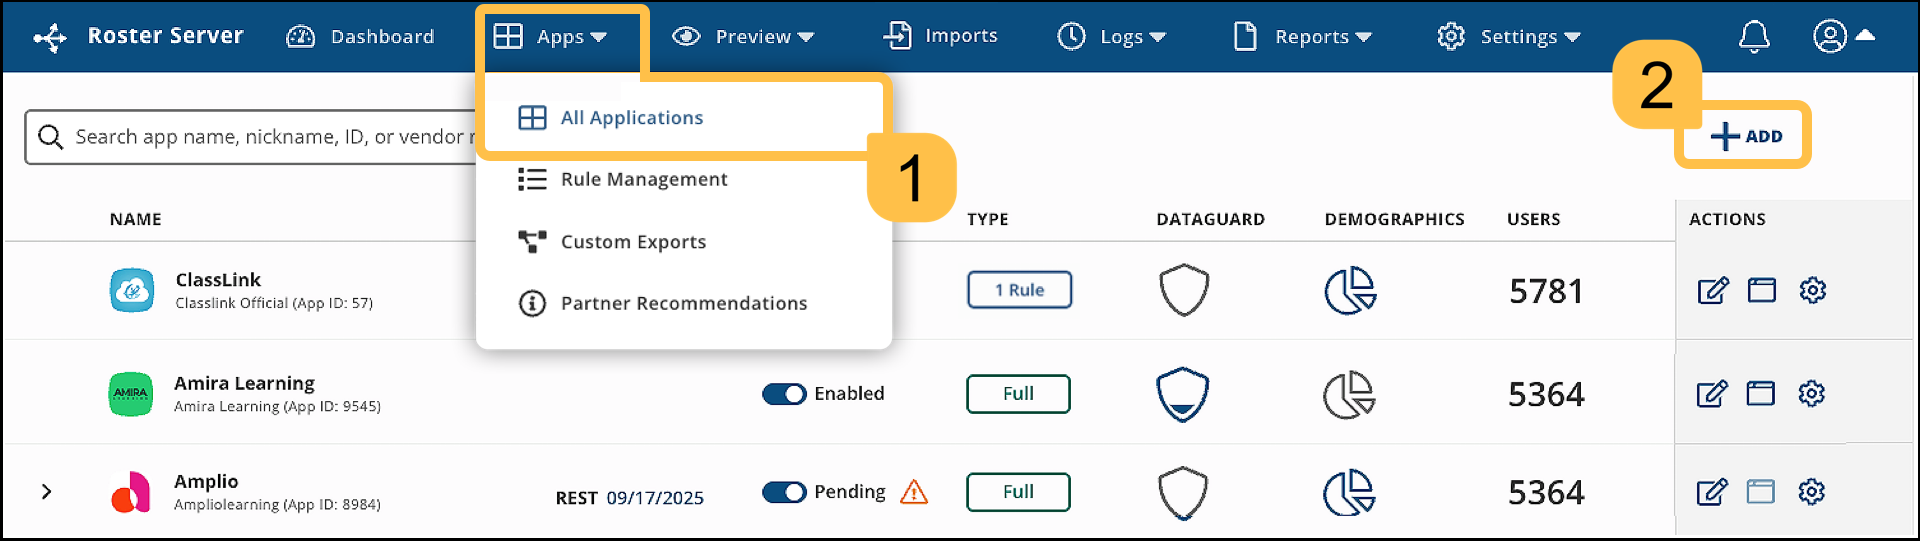
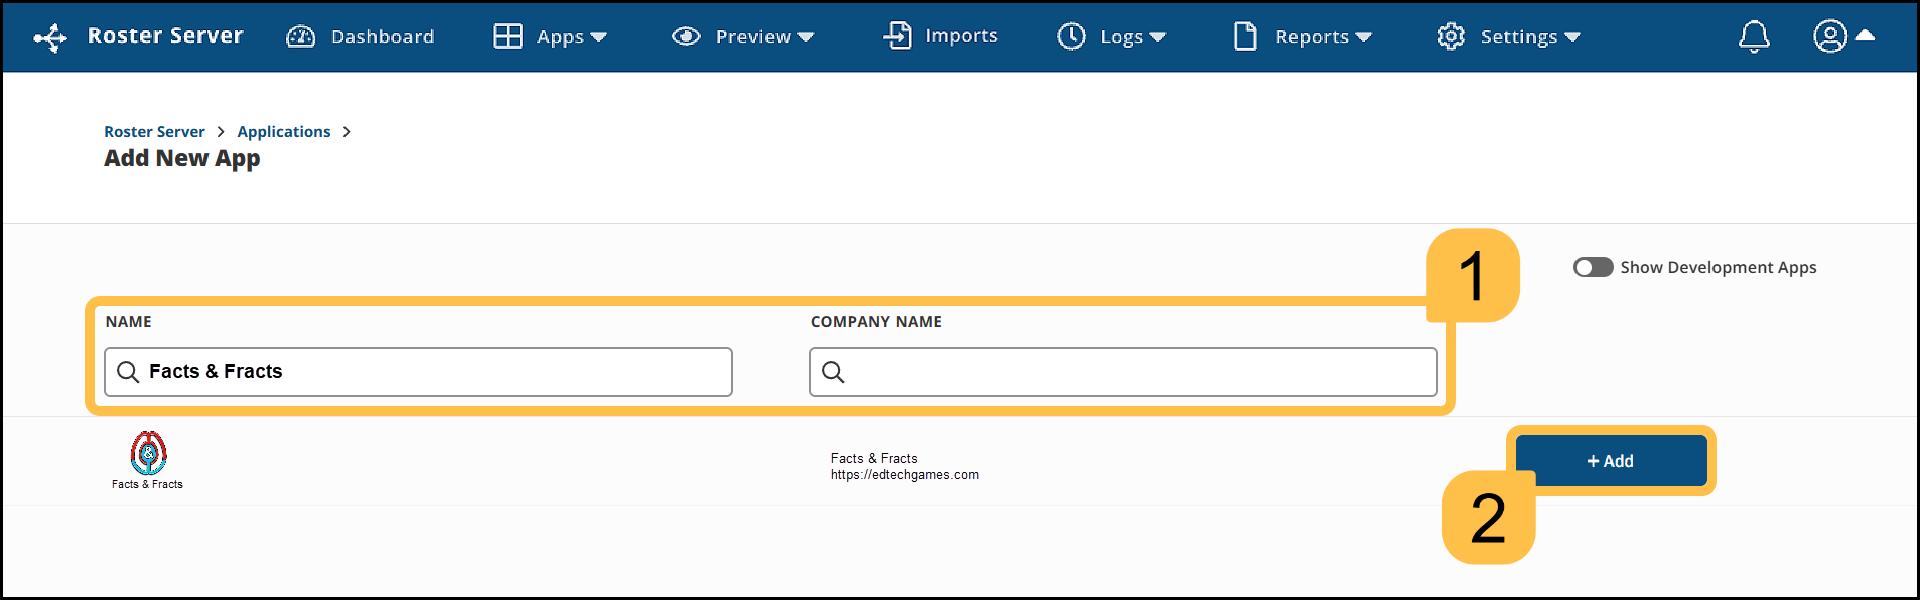
    Hover over Apps in the top navigation, select All Applications, then click + ADD. Search by NAME or COMPANY NAME for Facts & Fracts, then click + Add.

    This only notifies us that you have added us. No data moves yet.

    Roster Server: Apps, All Applications, ADD Roster Server: search by NAME or COMPANY NAME, then Add
  2. Set permissions.

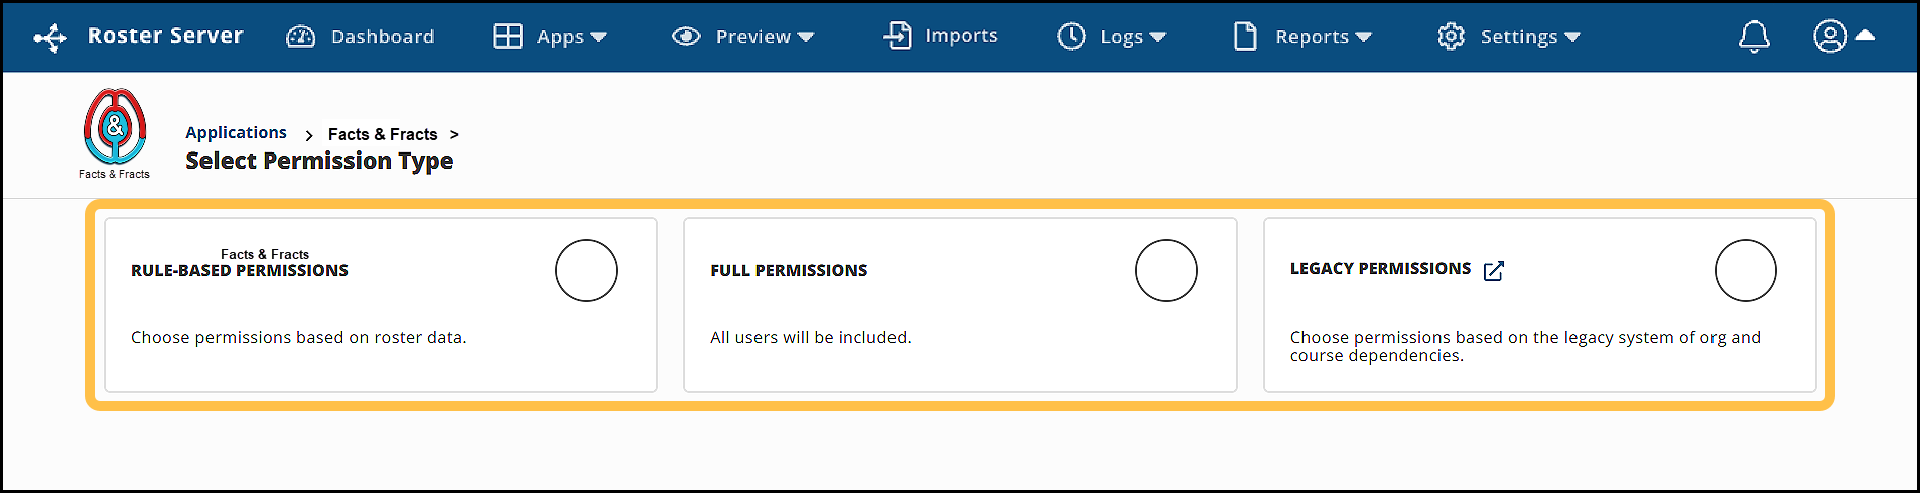
    Choose Rule-Based and limit it to the schools or grades using Facts & Fracts. Full also works, but it shares every student and staff record in the district. Do not use Legacy Custom.

    We need students, teachers, classes and enrollments for the schools you are including.

    Roster Server permission types: Rule-Based, Full, Legacy Custom
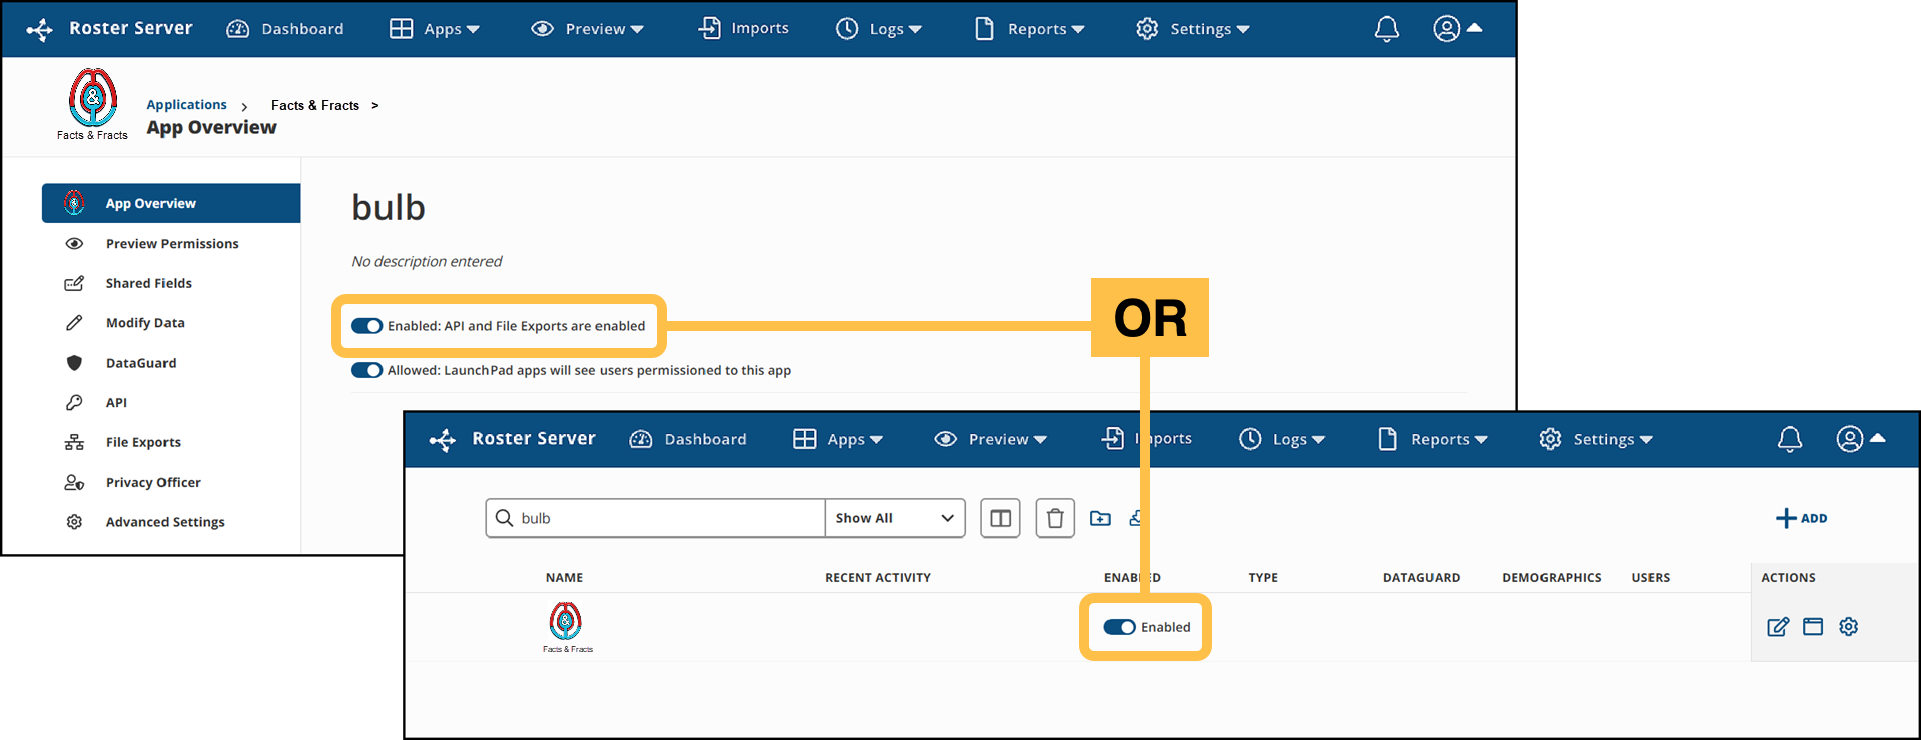
  3. Turn it on.

    Flip the Enabled toggle on either the App Overview page or the All Applications page. This is the moment your data actually starts flowing to us.

    Enable the application using the toggle
  4. Tell us you are done.

    Email support@edtechgames.com. We will confirm your data arrived and finish the setup on our end.

ClassLink also has a short video covering these Roster Server steps: Add Applications — Permission and Share.

How to tell it worked

  1. The Facts & Fracts icon appears on the LaunchPad of a test student and a test teacher.
  2. Clicking it logs them straight in — no username or password prompt.
  3. The teacher sees their real classes and students, not an empty account.

If any of those three is wrong, email support@edtechgames.com and tell us which one. That tells us exactly where to look.

Manual import

No Clever, ClassLink or Schoology? There are two ways in. Pick one.

Option A — send us your data and we will roster you

Usually the easiest route. Fill in this template: Single School Roster Template, then send it back securely at edtechgames.com/secure.php.

Please do not email student data as a plain attachment. Use the secure upload link above.

Option B, step 1 — create your account

If your school already has an Admin, ask them to set you up. Otherwise:

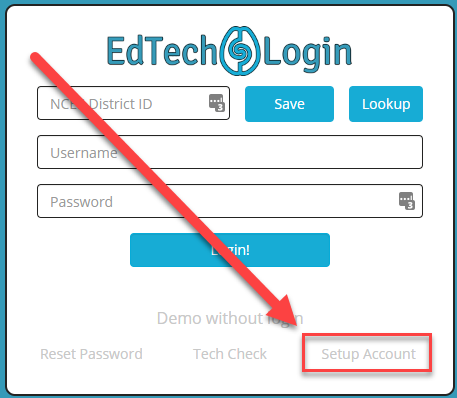
  1. Go to login.edtechgames.com and choose “Setup Account.” Setup Account
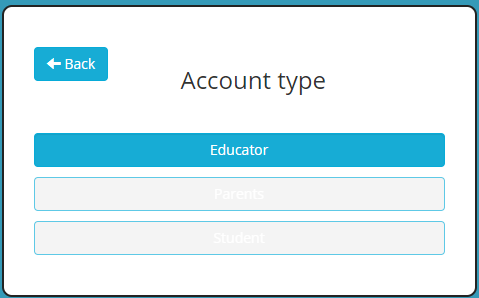
  2. Choose “Educator.” Choose Educator
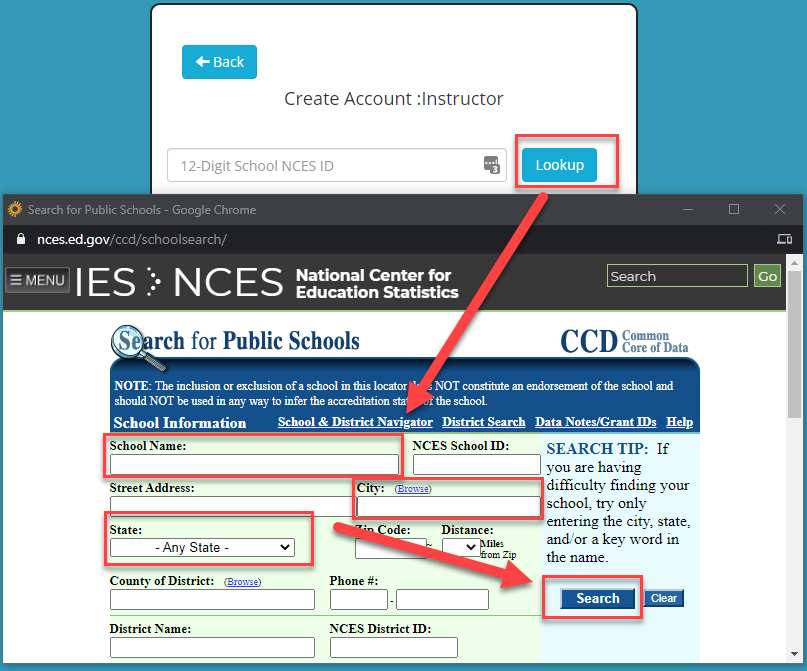
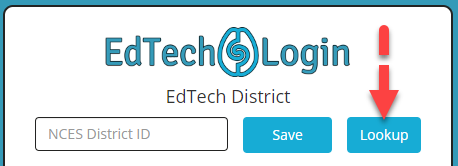
  3. Click “Lookup” to find your school’s 12-digit NCES ID. NCES ID lookup
  4. Fill in the rest of the form using your school email, so we can verify your connection to the school.
  5. Click the confirmation link we email you, then log in.

Option B, step 2 — import teachers and classes BEFORE students

Order matters. Students attach to classes, so classes and their teachers have to exist first.

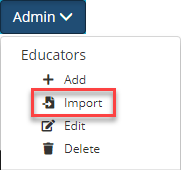
  1. In the Portal, go to Admin → Educators → Import. Menu: Admin, Educators, Import
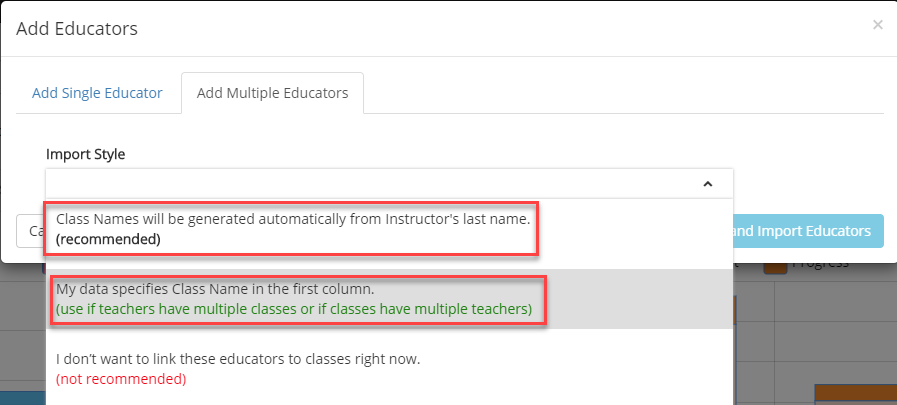
  2. Letting the system generate class names from the teacher’s last name is easiest, but you can name them yourself. Import Educators

Option B, step 3 — import students

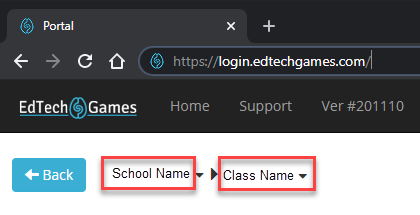
  1. At the top left, select your school to import several classes, or a single class to limit the import. Select school or class
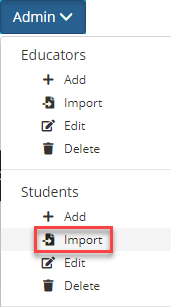
  2. Go to Students → Import. Menu: Students, Import
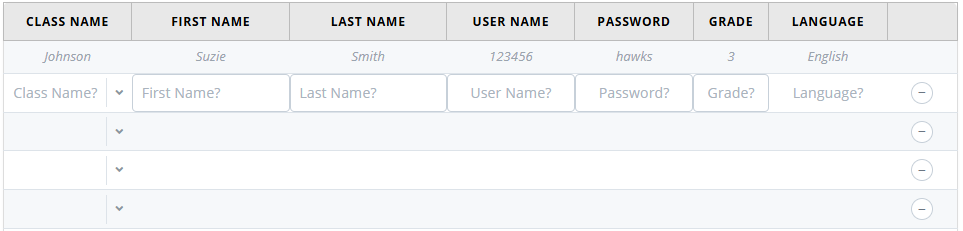
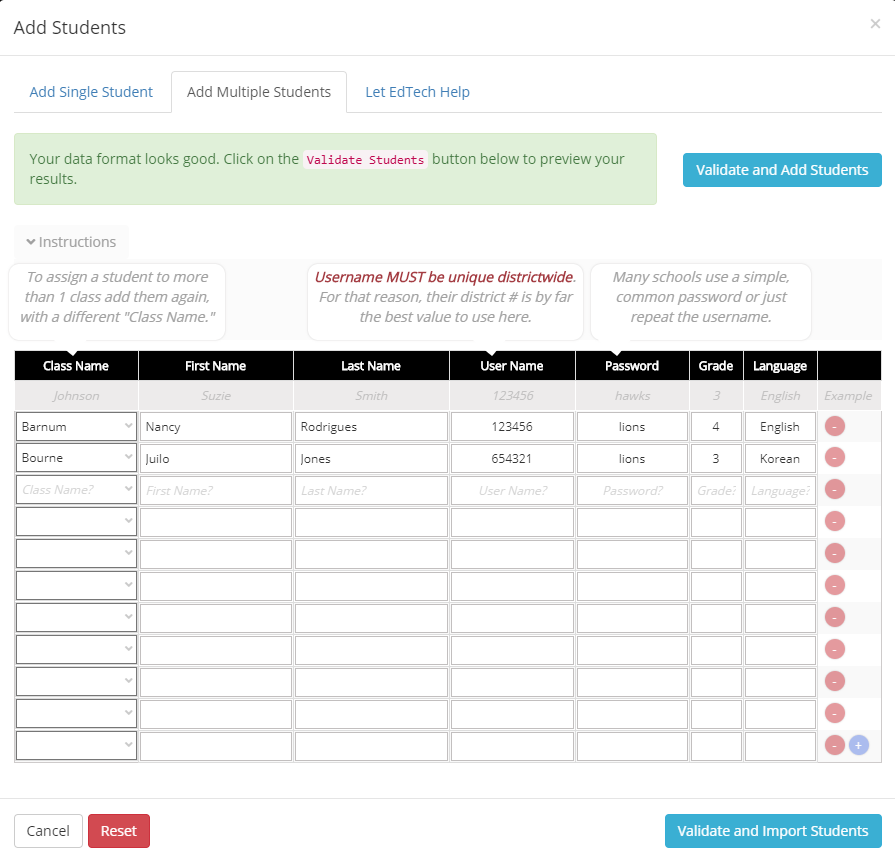
  3. Paste or type your student data into the table and correct any errors it flags.
  4. Usernames must be unique across the entire district, not just the school.
  5. Keep usernames and passwords simple. Many schools repeat the username as the password, or use one common password for the school.
  6. With no errors left, click “Validate and Import.” Import Students

How people log in afterwards

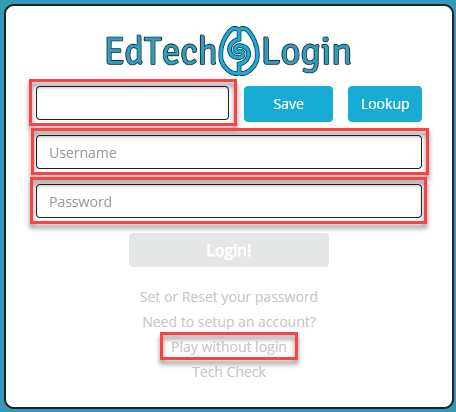
  1. Go to edtechgames.com → Login.
  2. Enter your district’s NCES number, unless it is already filled in.
  3. Enter username and password. Students get these from their teacher.
  4. To just demo the game, choose “Play without logging in.” Login screen

In the Portal, go to Menu → Actions → Create Login Link.

Give that link to students or bookmark it on classroom devices. It drops them on the login screen with your district already filled in, so they only type a username and password.

Playing at home

Find your device down the left and the way your school logs in across the top. Click the box where they meet for instructions.

Device Clever ClassLink Schoology Manual
Chromebook, laptop
or desktop
In the browser In the browser In the browser Direct login
iPhone or iPad In the app In the app In the app Direct login
Android phone
or tablet
In the browser In the app In the app Direct login

The two rules that cover every case

  1. On a computer, home is the same as school. They launch it just like at school.
  2. On a phone or tablet, they need the app. Download Facts & Fracts from the store. If your school uses Clever, ClassLink or Schoology, do not open the app directly — launch it from there so it gets fresh credentials.

Chromebook or laptop

Chromebook or laptop using Clever

Downloadable PDF for families

There is nothing to download. Everything runs in the Chrome browser.

  1. Open Chrome and go to clever.com/login, or your school’s own Clever page. Log in.
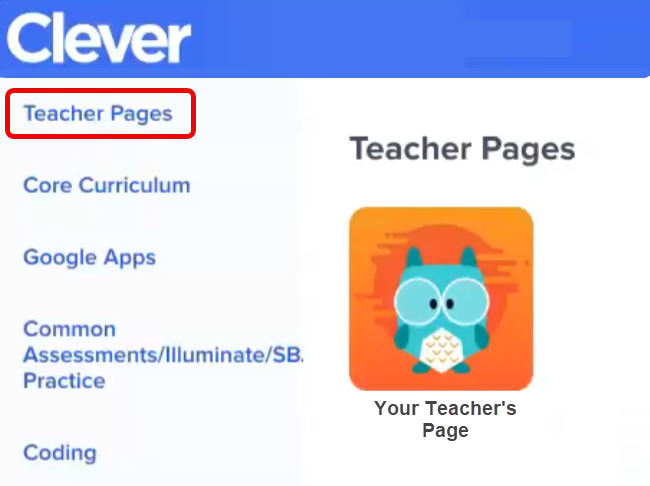
  2. Find the Facts & Fracts icon. In Clever it is often tucked inside the “Teacher Page.”
    Clever Teacher Page Facts and Fracts icon on the Teacher Page
  3. Click it. The game opens and logs the student in. Give it a few seconds the first time.
  4. Start from Clever each day rather than bookmarking the game — that is what logs them in.

Chromebook or laptop using ClassLink

There is nothing to download. Everything runs in the Chrome browser.

  1. Open Chrome and go to your district’s ClassLink page. Log in.
  2. Click the Facts & Fracts icon on the LaunchPad. ClassLink icon example
  3. The game opens and logs the student in automatically.
  4. Start from ClassLink each day rather than bookmarking the game.

Chromebook or laptop using Schoology

There is nothing to download. Everything runs in the Chrome browser.

  1. Open Chrome and go to your school’s Schoology site. Log in.
  2. Open the Course your teacher uses and click the Facts & Fracts link.
  3. The game opens and logs the student in automatically.
  4. Start from Schoology each day rather than bookmarking the game.

Chromebook or laptop with a direct login

There is nothing to download. Everything runs in the Chrome browser.

  1. Open Chrome and go to login.edtechgames.com.
  2. Enter your district’s NCES number, unless the link your teacher gave you already fills it in.
  3. Enter the username and password your teacher gave you.

Teachers: create a login link with the district ID built in, so students only type a username and password.

iPhone or iPad

iPhone or iPad using Clever

Downloadable PDF for families

  1. Download Clever from the App Store. Clever app
  2. Download the Facts & Fracts app. Do not open it — download only.
  3. Log in to Clever with the details your school provided.
  4. Find the Facts & Fracts icon. In Clever it is often tucked inside the “Teacher Page.”
    Clever Teacher Page Facts and Fracts icon on the Teacher Page
  5. Tap it. Clever launches the app and logs the student in.
  6. Quit and relaunch from Clever each day for fresh credentials.

iPhone or iPad using ClassLink

Downloadable PDF for families

  1. Download ClassLink from the App Store. ClassLink app
  2. Download the Facts & Fracts app. Do not open it — download only. Facts and Fracts app
  3. Log in to ClassLink. See your district for any specific instructions.
  4. Find the Facts & Fracts icon and launch it. Facts and Fracts icon
  5. ClassLink launches the app and logs the student in. Logged in
  6. Quit and relaunch from ClassLink each day for fresh credentials.

iPhone or iPad using Schoology

  1. Download Schoology from the App Store. Schoology app
  2. Download the Facts & Fracts app. Do not open it — download only.
  3. Log in to Schoology and open the Course your teacher uses.
  4. Tap the Facts & Fracts link. Schoology launches the app and logs the student in.
  5. Quit and relaunch from Schoology each day for fresh credentials.

iPhone or iPad with a direct login

  1. Download Facts & Fracts from the App Store.
  2. Open it. It asks for your 7-digit NCES ID, username and password. The username and password come from the teacher, and you can look up the district ID right on the login screen. NCES ID lookup button

On a computer there is nothing to install — log in through the browser instead.

Android

Android using Clever

Clever does not make an Android app, so this one runs in the browser.

  1. Open Chrome and go to clever.com/login. Log in.
  2. Find the Facts & Fracts icon — often inside the “Teacher Page” — and tap it.
  3. The game opens in the browser and logs the student in.

Android using ClassLink

Downloadable PDF for families

  1. Download ClassLink from Google Play.
  2. Download Facts & Fracts from Google Play. Do not open it — download only.
  3. Log in to ClassLink and tap the Facts & Fracts icon.
  4. ClassLink launches the app and logs the student in.
  5. Quit and relaunch from ClassLink each day for fresh credentials.

Chrome works too, but the app runs better on Android.

Android using Schoology

  1. Download Schoology from Google Play.
  2. Download Facts & Fracts from Google Play. Do not open it — download only.
  3. Log in to Schoology, open the Course your teacher uses, and tap the Facts & Fracts link.
  4. Quit and relaunch from Schoology each day for fresh credentials.

Chrome works too, but the app runs better on Android.

Android with a direct login

  1. Download Facts & Fracts from Google Play.
  2. Open it. It asks for your 7-digit NCES ID, username and password. Those come from the teacher, and you can look the district ID up right on the login screen. NCES ID lookup button

Chrome works too — go to login.edtechgames.com — but the app runs better on Android.

Reports

Four levels, the same shape at every one: who is playing, how far they have come, and exactly which facts and standards they have.

District report District

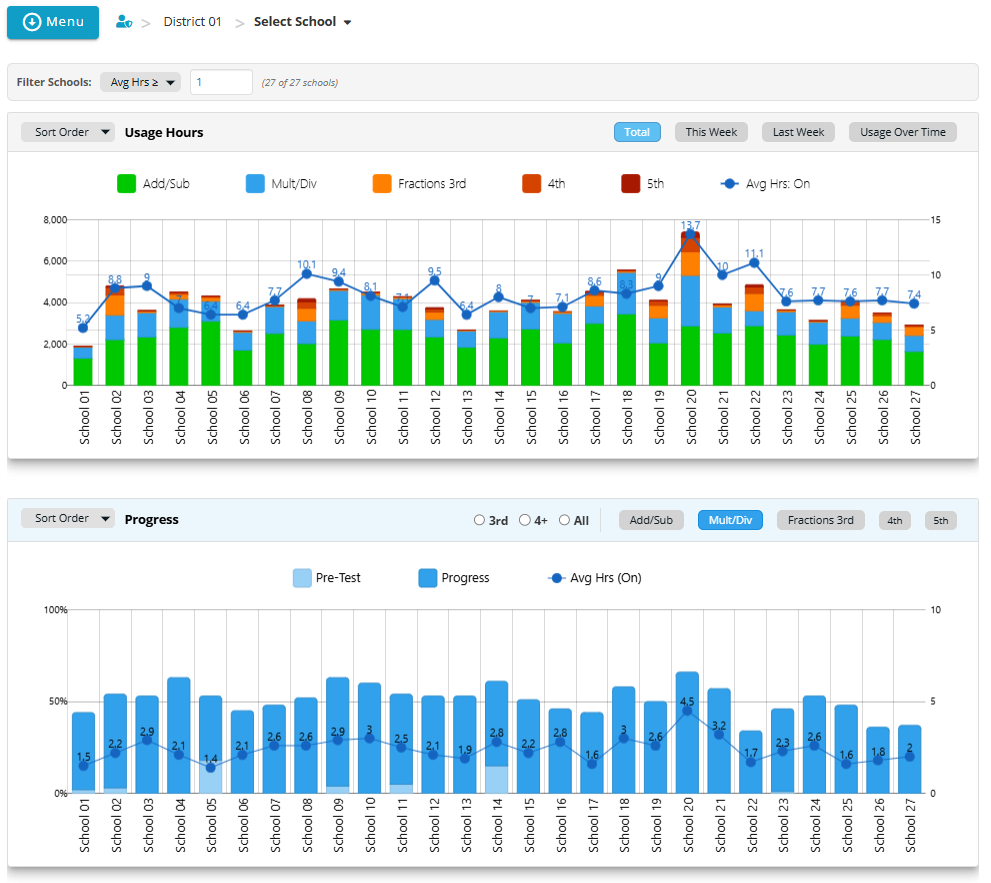
Every school in the district on one screen. One bar per school, so you can see at a glance who is playing and who is moving.

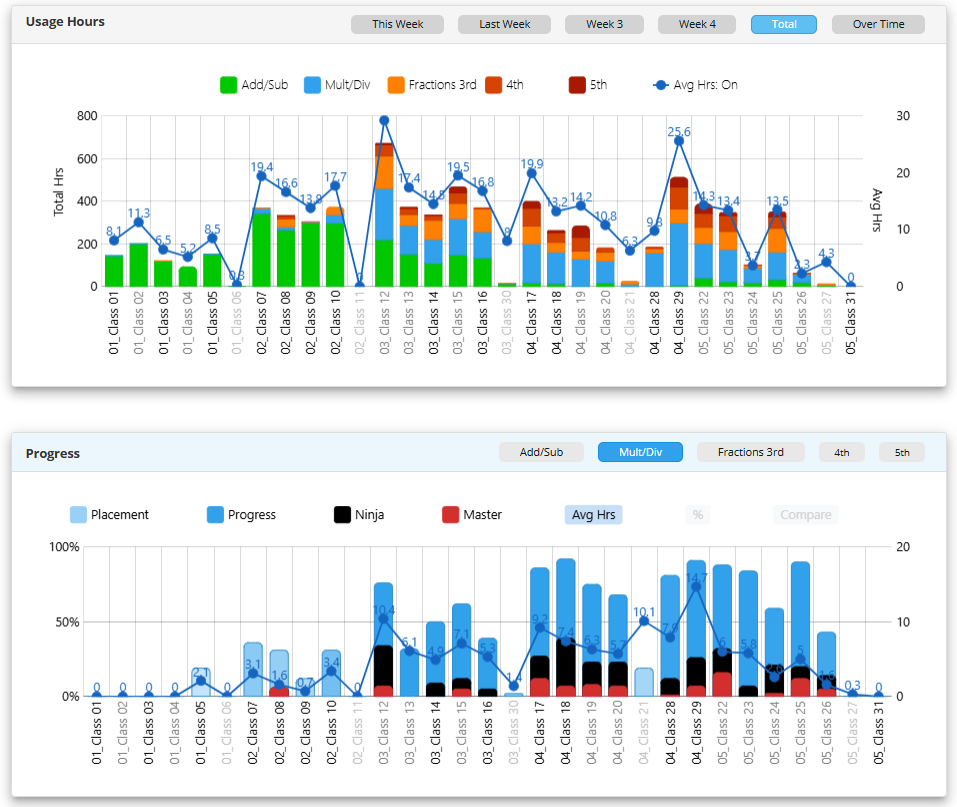
In the top chart the colours are the programs — Add/Sub, Mult/Div, and Fractions for 3rd, 4th and 5th — and the line running across the top is average hours per student. In the bottom chart the pale bar is where students placed on the pre-test and the solid bar is where they are now. The gap between them is the learning.

District report: usage hours and progress for every school

Usage hours and progress across 27 schools. Click any school to open its own report.

Switch between Total, This Week, Last Week and Usage Over Time, sort the schools any way you like, and hide any school below an average-hours threshold. Pick a school to drop straight into its report.

School report

Usage and progress

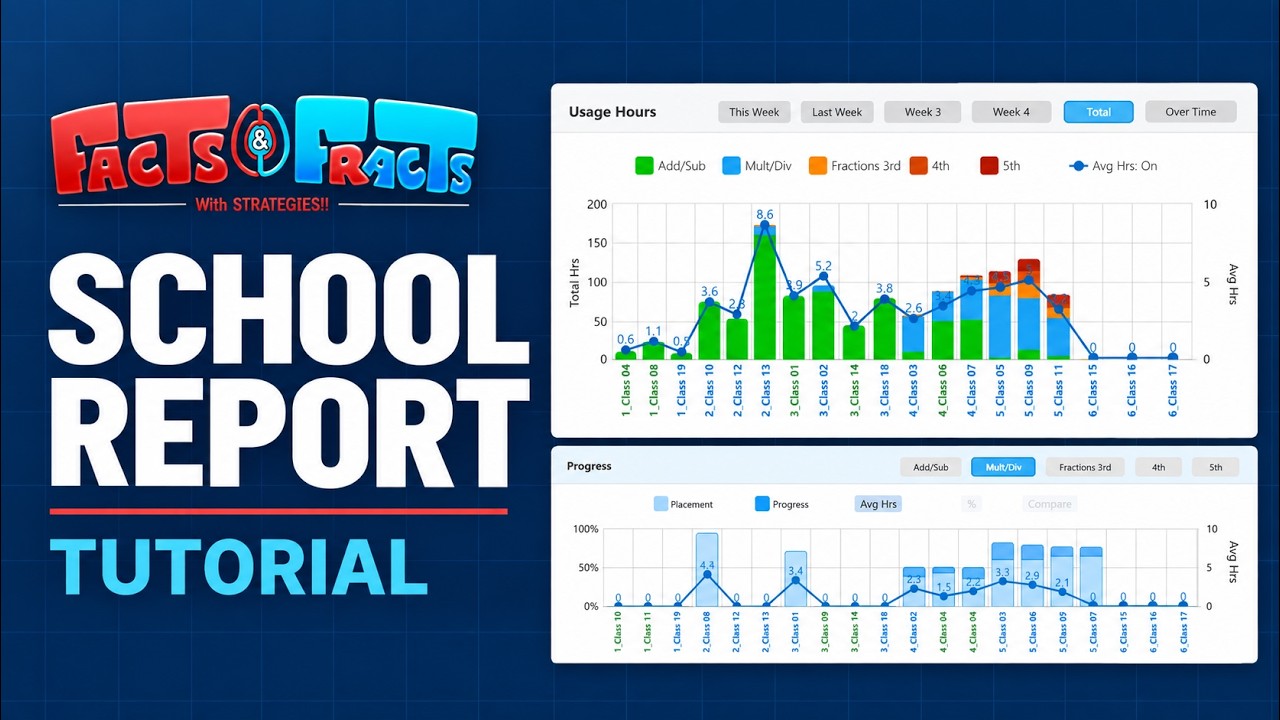
The same two charts, one bar per class instead of per school. The week buttons split the term up, so you can see this week on its own rather than everything averaged together. Classes that have not logged any time yet stay greyed out.

School report: usage hours and progress for every class

Every class in the school. The line is average hours per student, read against the right-hand axis.

The progress chart stacks placement, progress, and the Ninja and Master fluency levels into one bar, so a class that has gone well past simply finishing is obvious at a glance. Pick a program along the top to switch the whole chart to Add/Sub, Mult/Div or Fractions.

The detail tables

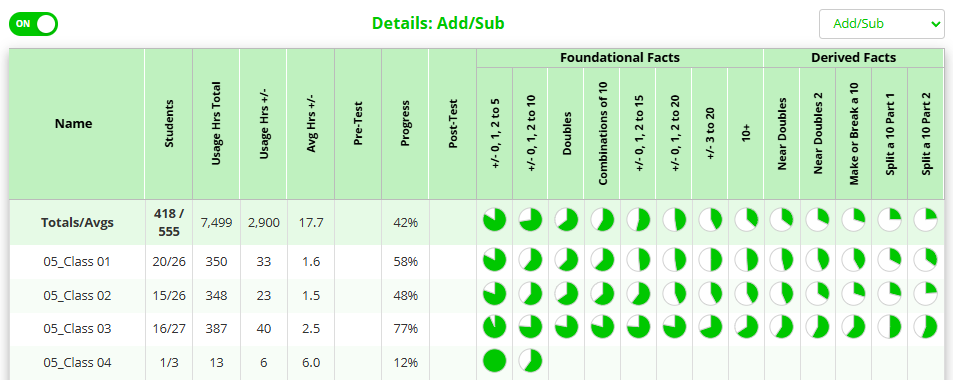
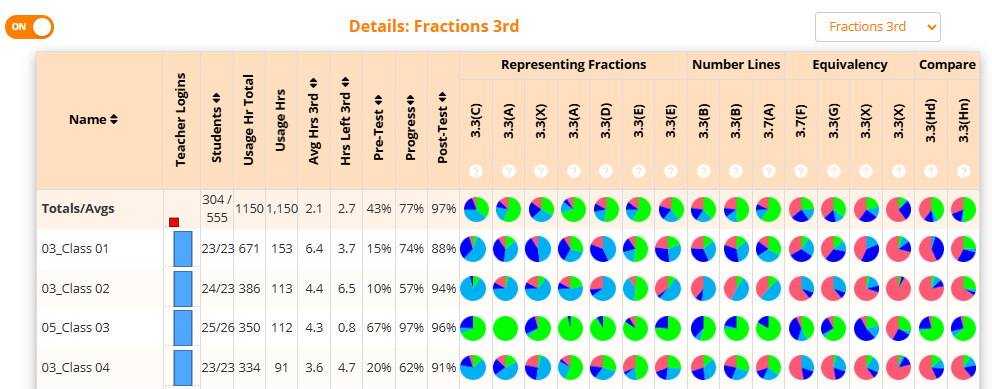
Below the charts sits a table for each program. Every row is a class. The columns on the left are the numbers — students, hours, pre-test, progress, post-test — and the columns on the right are the actual content, one per fact group or standard, drawn as a pie showing how much of the class has it.

School detail table for Add/Sub, showing foundational and derived fact groups per class

Add/Sub, split into Foundational Facts and Derived Facts.

Fractions works the same way, with standards in place of fact groups, grouped under headings like Representing Fractions, Number Lines, Equivalency and Compare. The little ? under each standard code tells you what that standard covers.

School detail table for 3rd grade fractions, showing mastery per standard per class

3rd grade fractions. This example shows TEKS; your report shows your own state’s standards.

Each program keeps its own colour throughout the reports — green for Add/Sub, blue for Mult/Div, orange through red for 3rd, 4th and 5th grade fractions — so you always know which table you are looking at.

Class report

Usage and progress

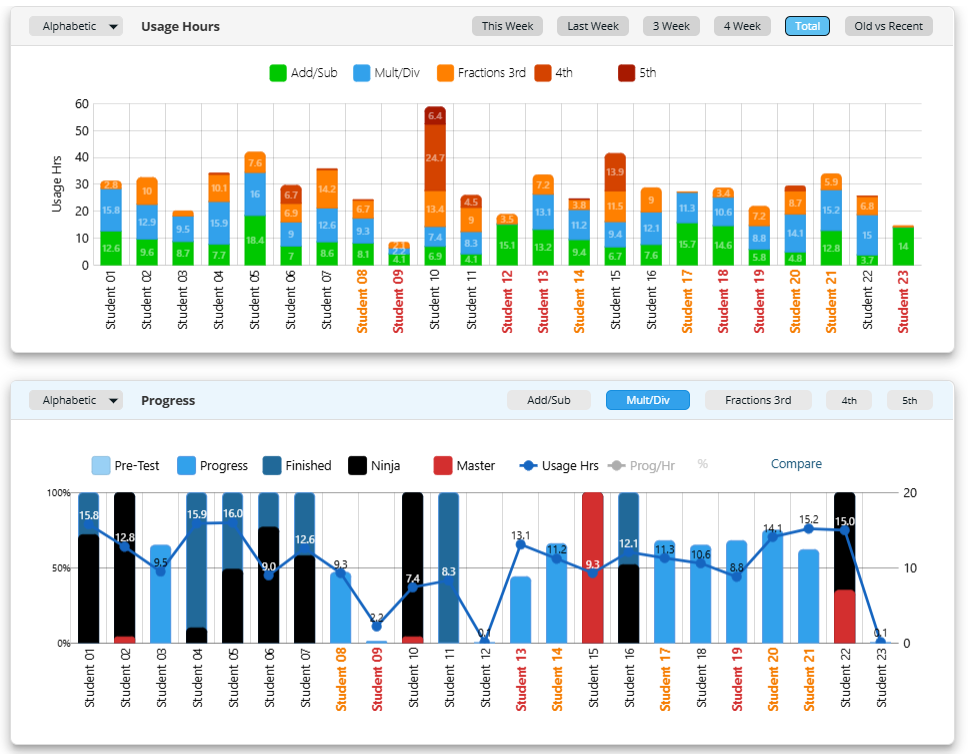
One bar per student. The top chart shows how each student split their time between programs; the bottom chart shows where they placed and how far they have gone, with the usage-hours line laid over the top so you can read effort against result in a single glance.

Class report: usage hours and progress for every student

A student with a tall bar and a flat line, or the other way round, is the one worth a conversation.

The detail tables

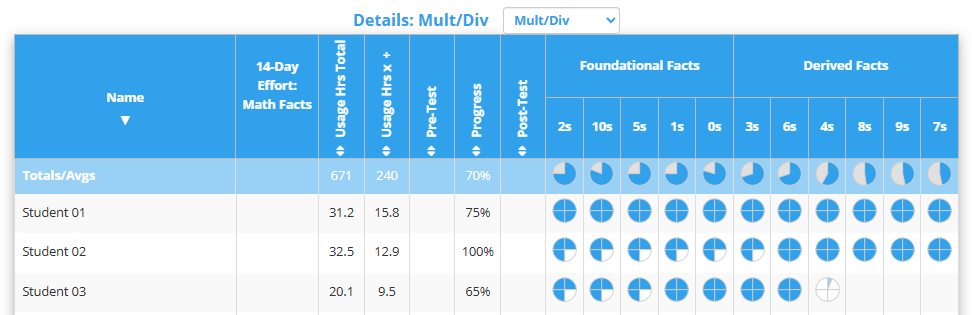
This is where the detail lives. One row per student, the same columns of numbers on the left, then one cell per fact family or standard on the right.

For Mult/Div the columns are the fact families in teaching order — the foundational 2s, 10s, 5s, 1s and 0s first, then the derived 3s, 6s, 4s, 8s, 9s and 7s. The fuller the circle, the more of that family the student has.

Class detail table for Mult/Div, showing each student's progress through the fact families

Mult/Div fact families, one row per student. The top row is the class average.

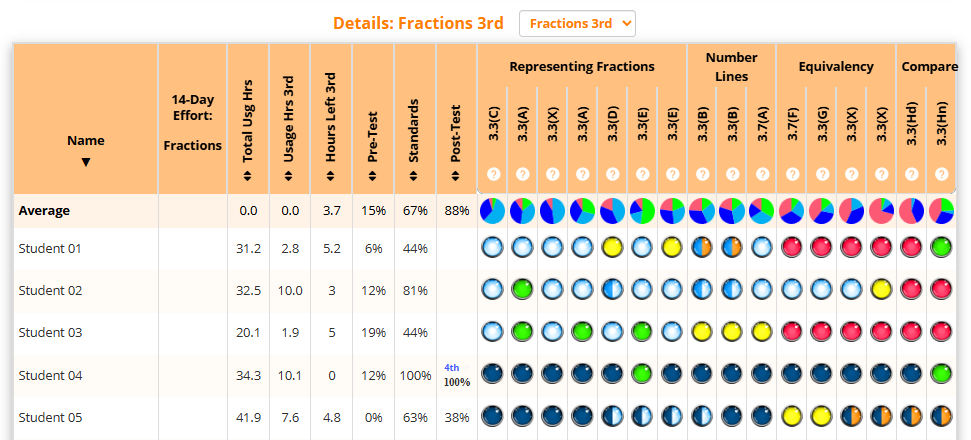
Fractions swaps the fact families for standards, and each cell becomes that student’s status on that standard.

Class detail table for 3rd grade fractions, showing each student's status on every standard

3rd grade fractions, standard by standard. A student who has moved on shows their next grade in the post-test column.

Student report

Minutes and progress

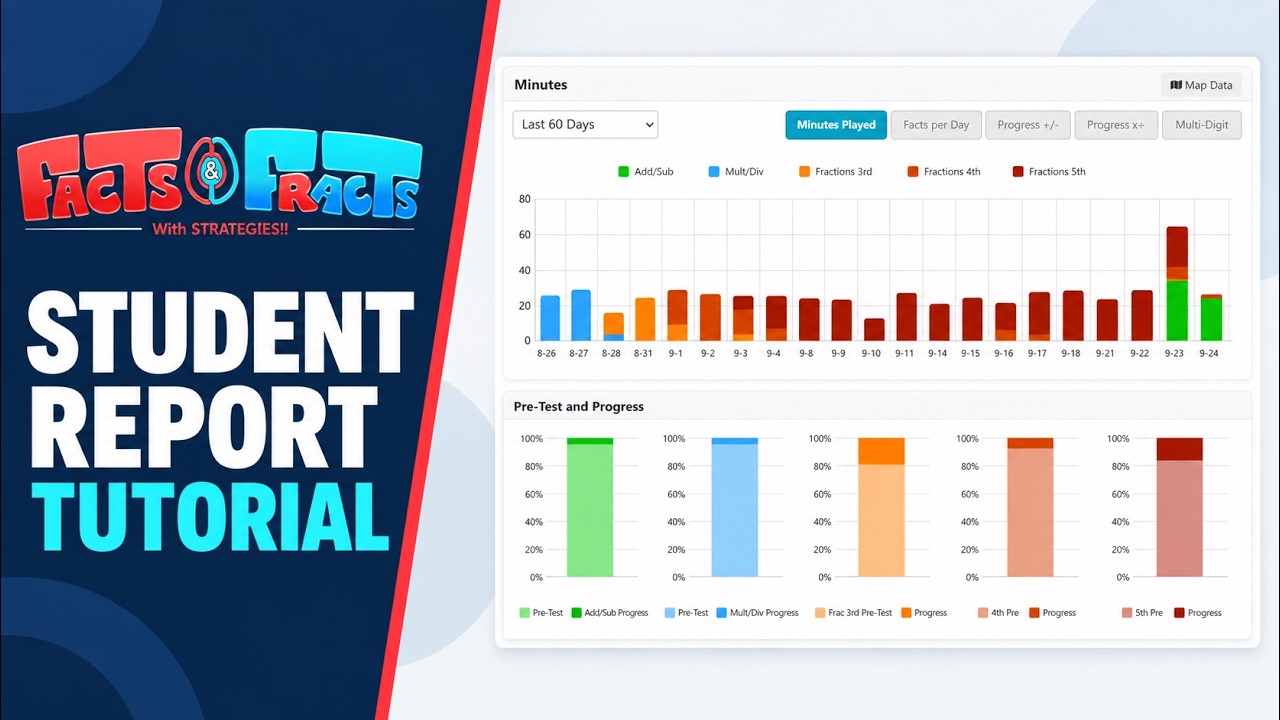
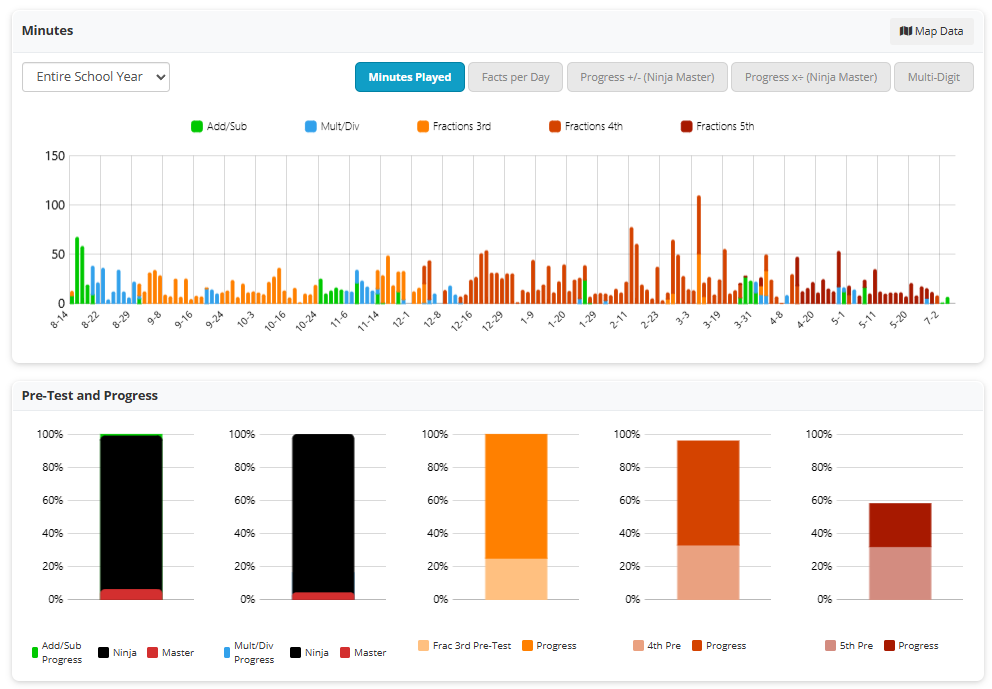
Every day the student played, right across the school year, coloured by which program they were in. It is the quickest way to see whether a student is playing steadily or in occasional bursts — and when they moved from one program to the next.

Student minutes played per day across the school year, with pre-test and progress per program

Minutes played per day, then pre-test against progress for each program underneath.

The buttons above the chart swap minutes for facts per day, or for progress in each operation measured against the Ninja and Master levels. Narrow the window with the dropdown when you only care about a particular stretch of the year.

The overview

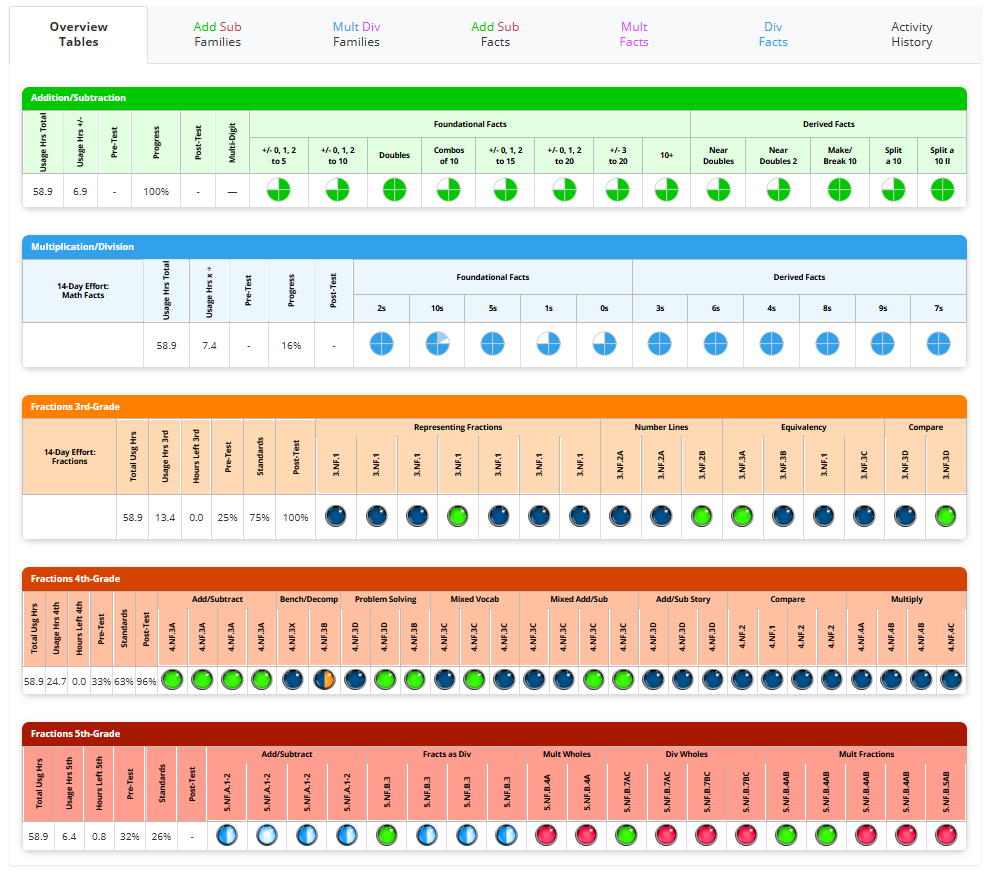
One band per program, in that program’s colour, stacked down the page. Each band carries the numbers for that program — hours played, hours left, pre-test, progress, post-test — and then every fact group or standard it contains.
Student overview: one band per program with every fact group and standard

Add/Sub finished, Mult/Div under way, and fractions running from 3rd through 5th grade.

The tabs across the top go deeper into any of it: the fact families, the individual facts, and an activity history of everything the student has played.

The fact families

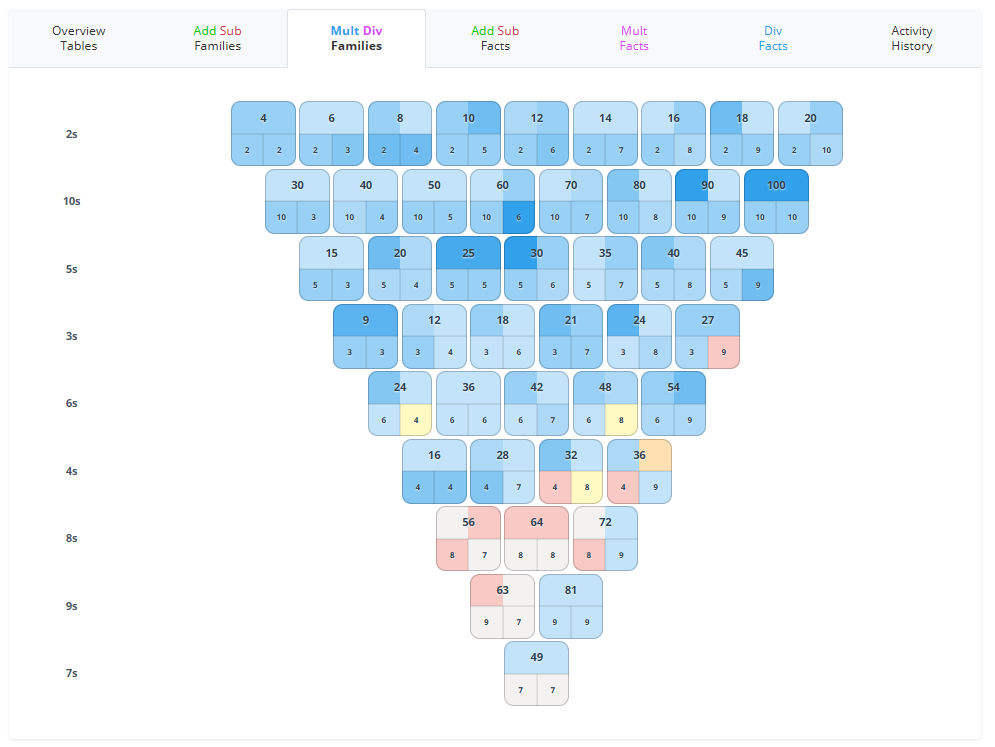
This is the view to turn around and show the student. Every fact in every family, laid out as a pyramid in teaching order, each tile carrying the answer and the two factors that make it. The shading is how solid the student is on that fact, so the work still ahead is the pale part of the picture.

Student Mult/Div fact families laid out as a pyramid, shaded by how well each fact is known

Mult/Div families from the 2s down to the 7s. Add/Sub has its own tab with the same layout.

Students tend to find this one motivating in a way a percentage never is: they can see the exact facts they own, and the handful standing between them and the next family.

Success panel

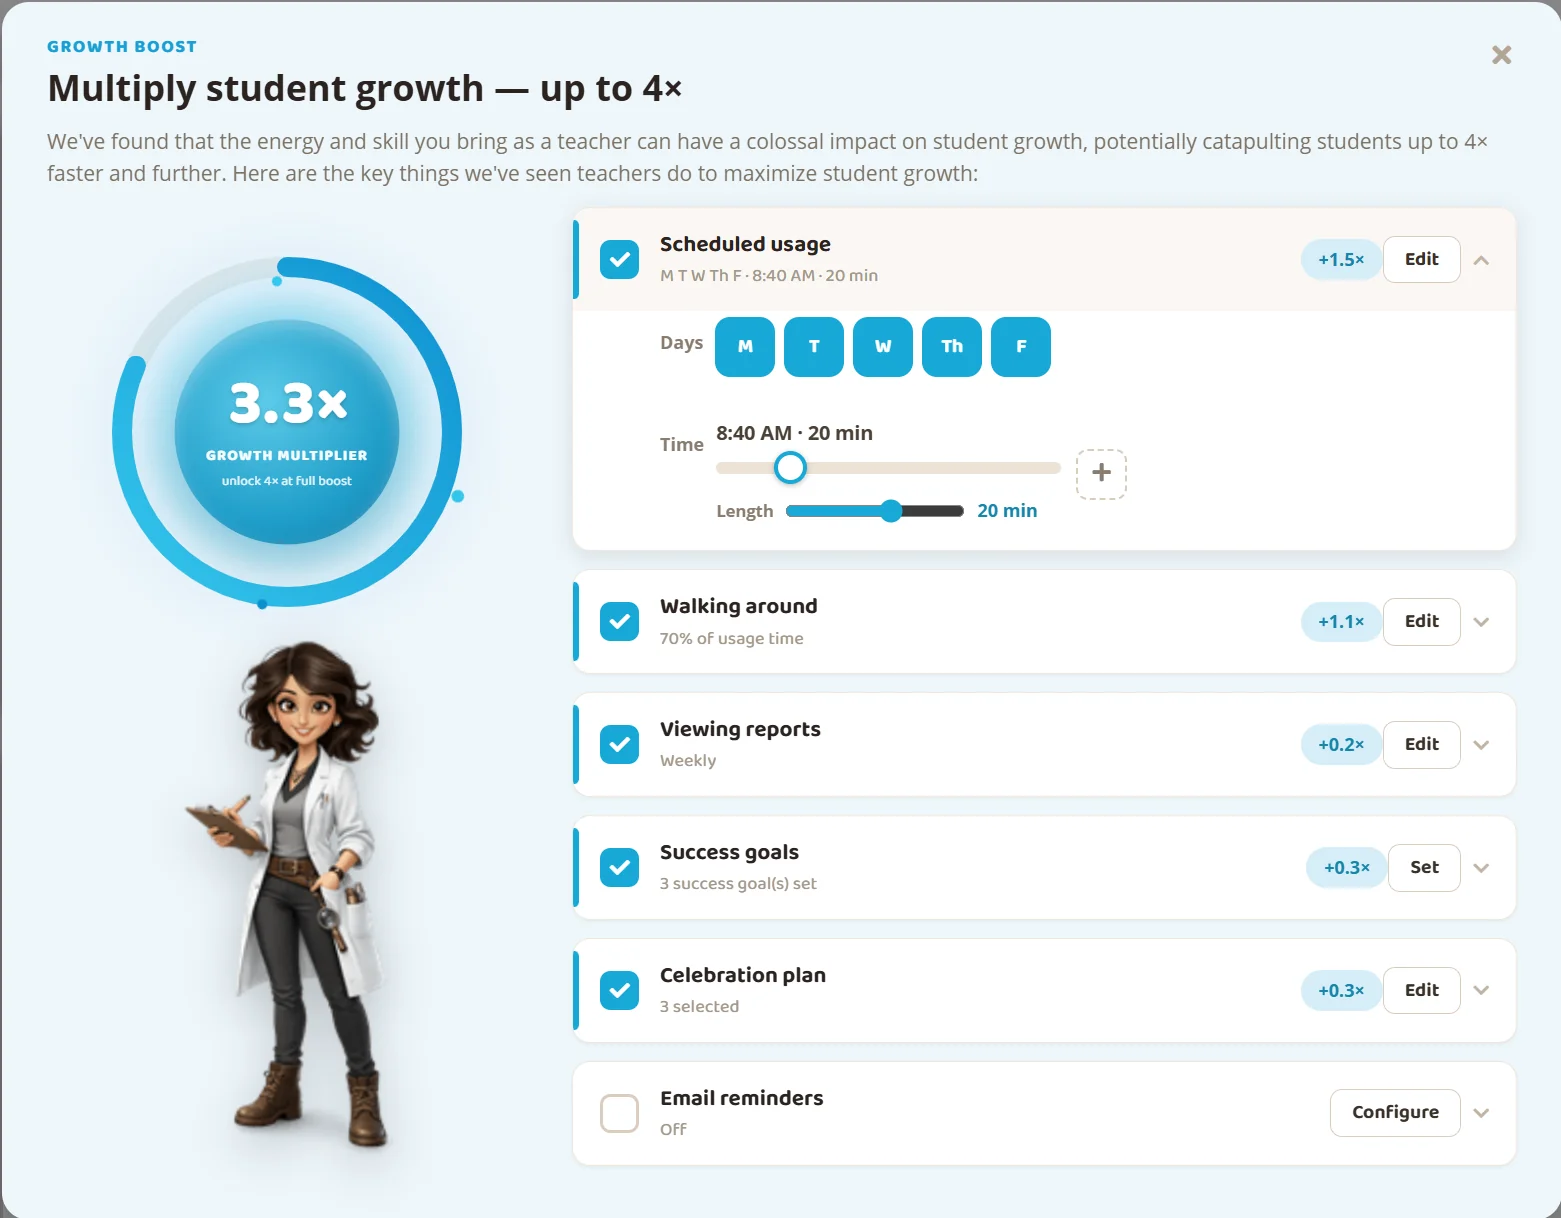
Teachers who implement effectively tend to get 3 or 4 times better results.

The Success panel helps you plan those critical implementation activities. Build in each one, and your students will finish significantly faster.

Click the blue Success button in the top-right corner of your reports.

The report buttons, with the blue Success button highlighted The Success panel: a growth multiplier beside a checklist of scheduled usage, walking around, viewing reports, success goals, a celebration plan and email reminders

Each activity you plan adds to the growth multiplier.

Progress Health

Click the orange Health button in the top-right corner of your reports.

The report buttons, with the orange Health button highlighted

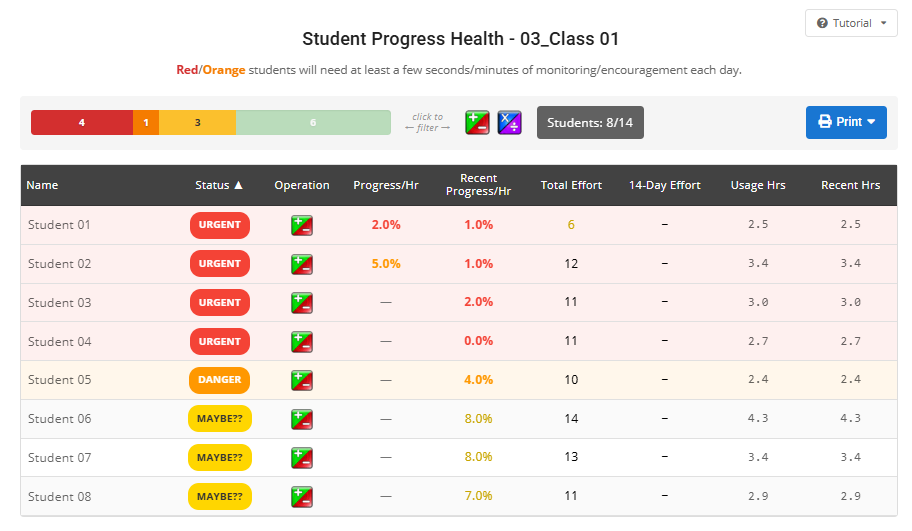
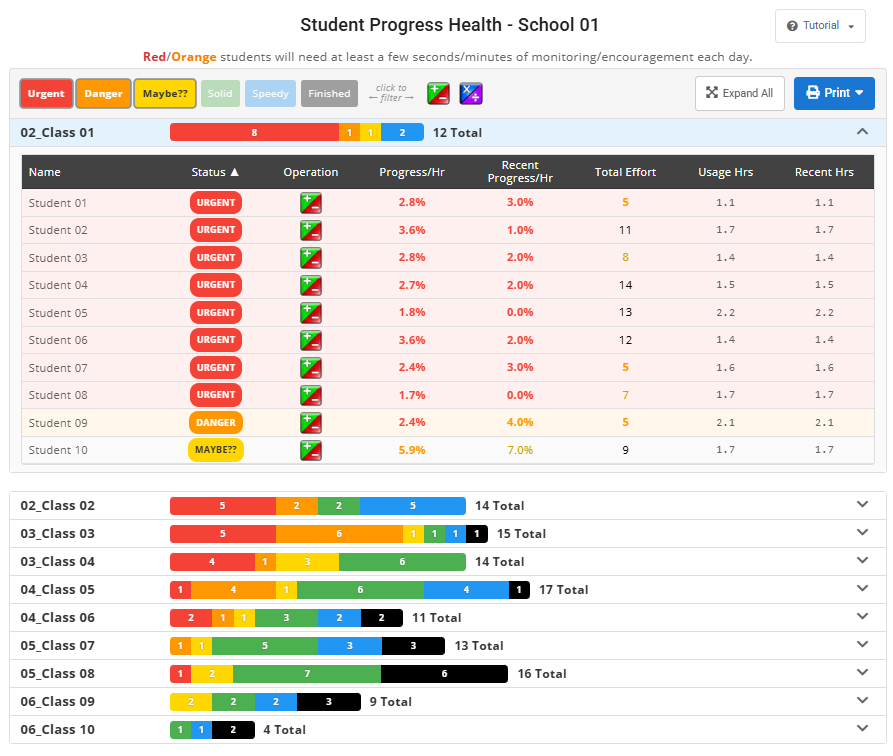
Progress Health highlights students who are not progressing as quickly as we would like. The goal is to implement well enough to move every student out of red and orange.
That may not always be possible. But each day, you will know exactly which students need extra support.
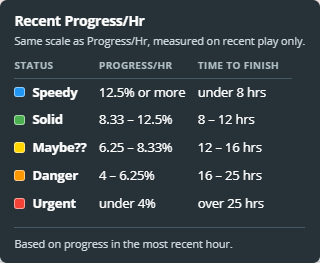
The key metric is Recent Progress/Hr: how much a student has progressed in their last 60 minutes of play.

Recent Progress per hour statuses: Speedy 12.5% or more, Solid 8.33 to 12.5%, Maybe 6.25 to 8.33%, Danger 4 to 6.25%, Urgent under 4%

Each status, and the time to finish it points to.

Student Progress Health for one class, sorted by status from Urgent down

One class, most urgent first. Click the coloured bar to filter by status.

In the usage and progress graphs

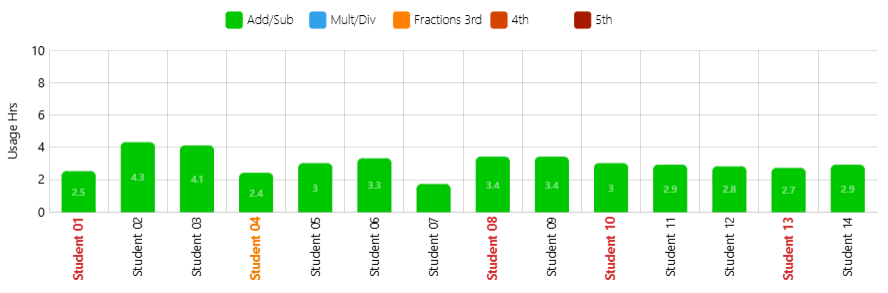
Urgent and Danger students’ names also show in red and orange in the Usage and Progress graphs.

Usage graph with Urgent student names in red and a Danger student name in orange

Students 01, 08, 10 and 13 are Urgent. Student 04 is in Danger.

For the whole school

The School Report has a version for Admins and Coaches that covers every class. Expand any class for details, or print the report to share with teachers or carry with you as you talk with them.

Student Progress Health for a whole school, one bar per class, with the first class expanded

Every class in the school, with one expanded.

What is Map Data?

Map Data is a map of everything a student does in the game: every question, every answer, and how long each one took.

Click the purple Map button in the top-right corner of your reports.

The report buttons, with the purple Map button highlighted

Why isn’t a student progressing?

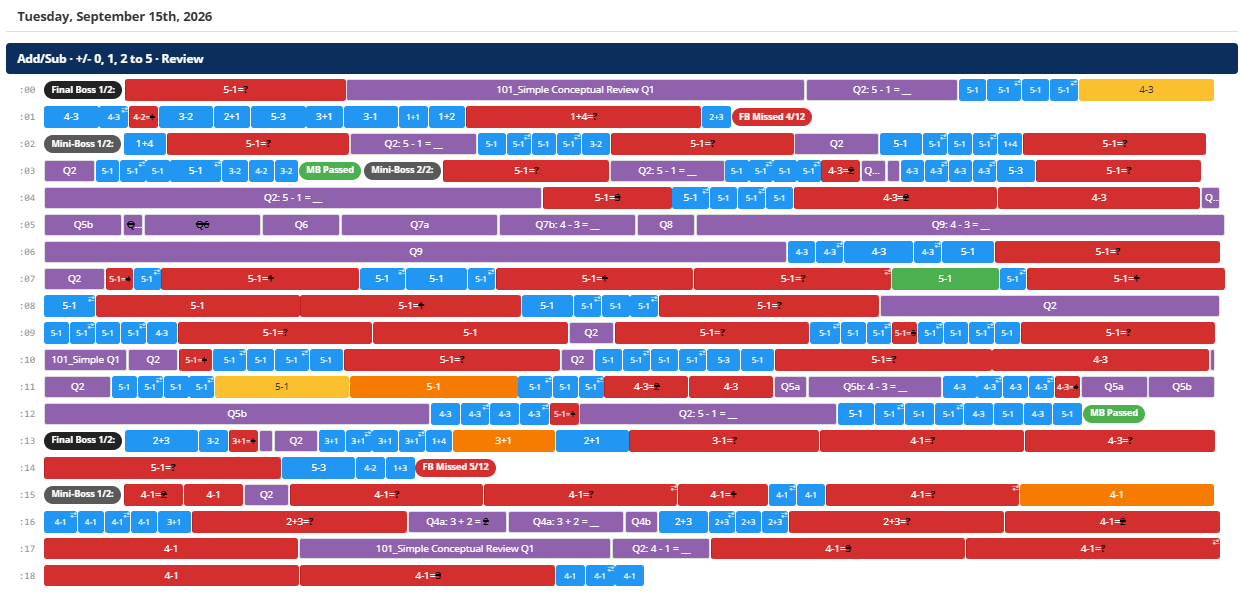
Each row is roughly one minute of play, and each block is one step in the game. The wider the block, the longer it took. Hover over each block for more info.

This student misses 5-1 and 4-1 over and over. But most of the time they answer those same facts perfectly and instantly — so they are probably missing them on purpose.

Map Data for one student: rows of red misses on 5-1 and 4-1 between quick blue correct answers

Long red blocks are misses. The short blue blocks between them are the same facts, answered instantly.

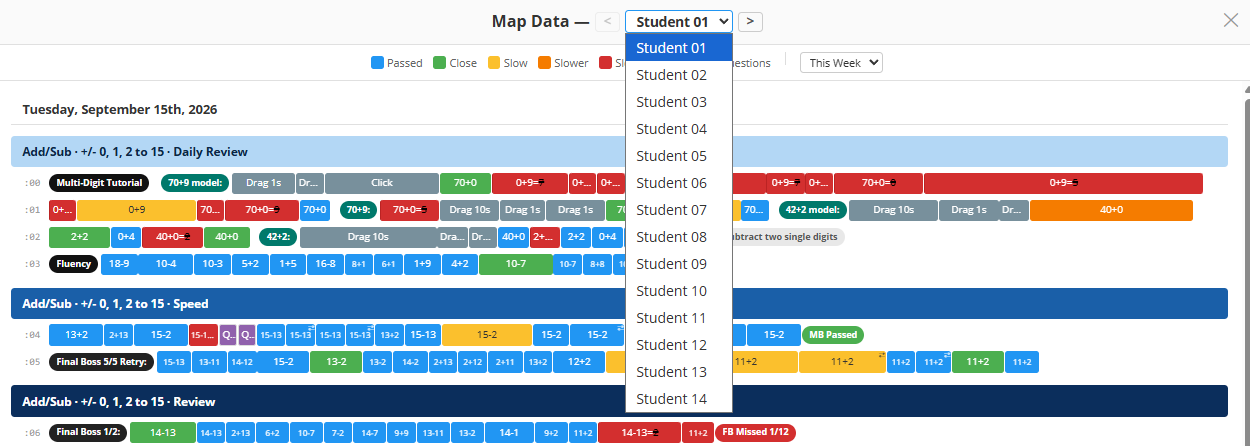
Map Data is on each Student Report. In the Class Report, you can step through every student in the class.

Map Data in the Class Report, with a dropdown to pick any student in the class

Pick a student from the dropdown, or use the arrows to step through them.

Show students how effort changes their speed

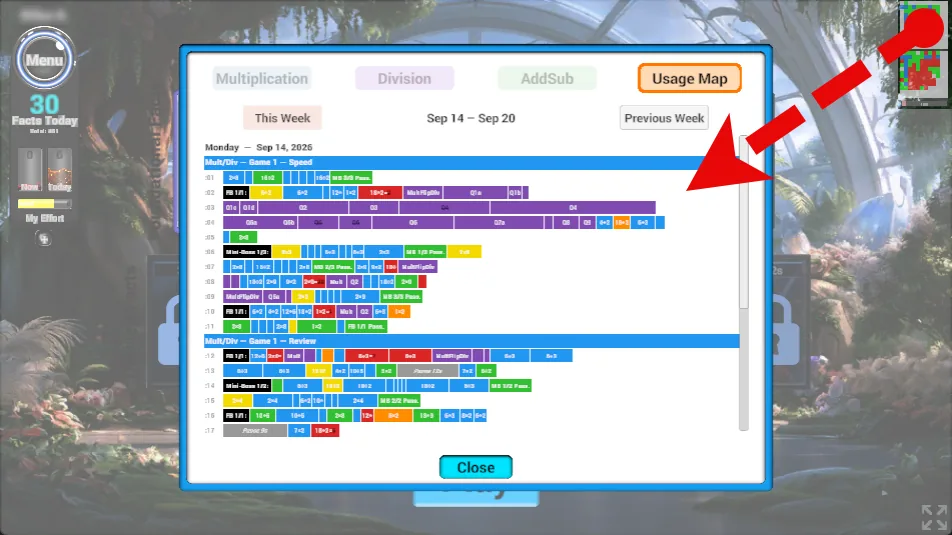
Students can see a simple version while they play. It is a great way to show them how their effort speeds them up — or slows them down.

In the game, have them click the Progress Grid in the top-right corner, then Usage Map.

The Usage Map inside the game, opened from the Progress Grid in the top-right corner

The Usage Map in the game, opened from the Progress Grid.

Battle Mode

Click the green Battle button in the top-right corner of your reports.

The report buttons, with the green Battle button highlighted
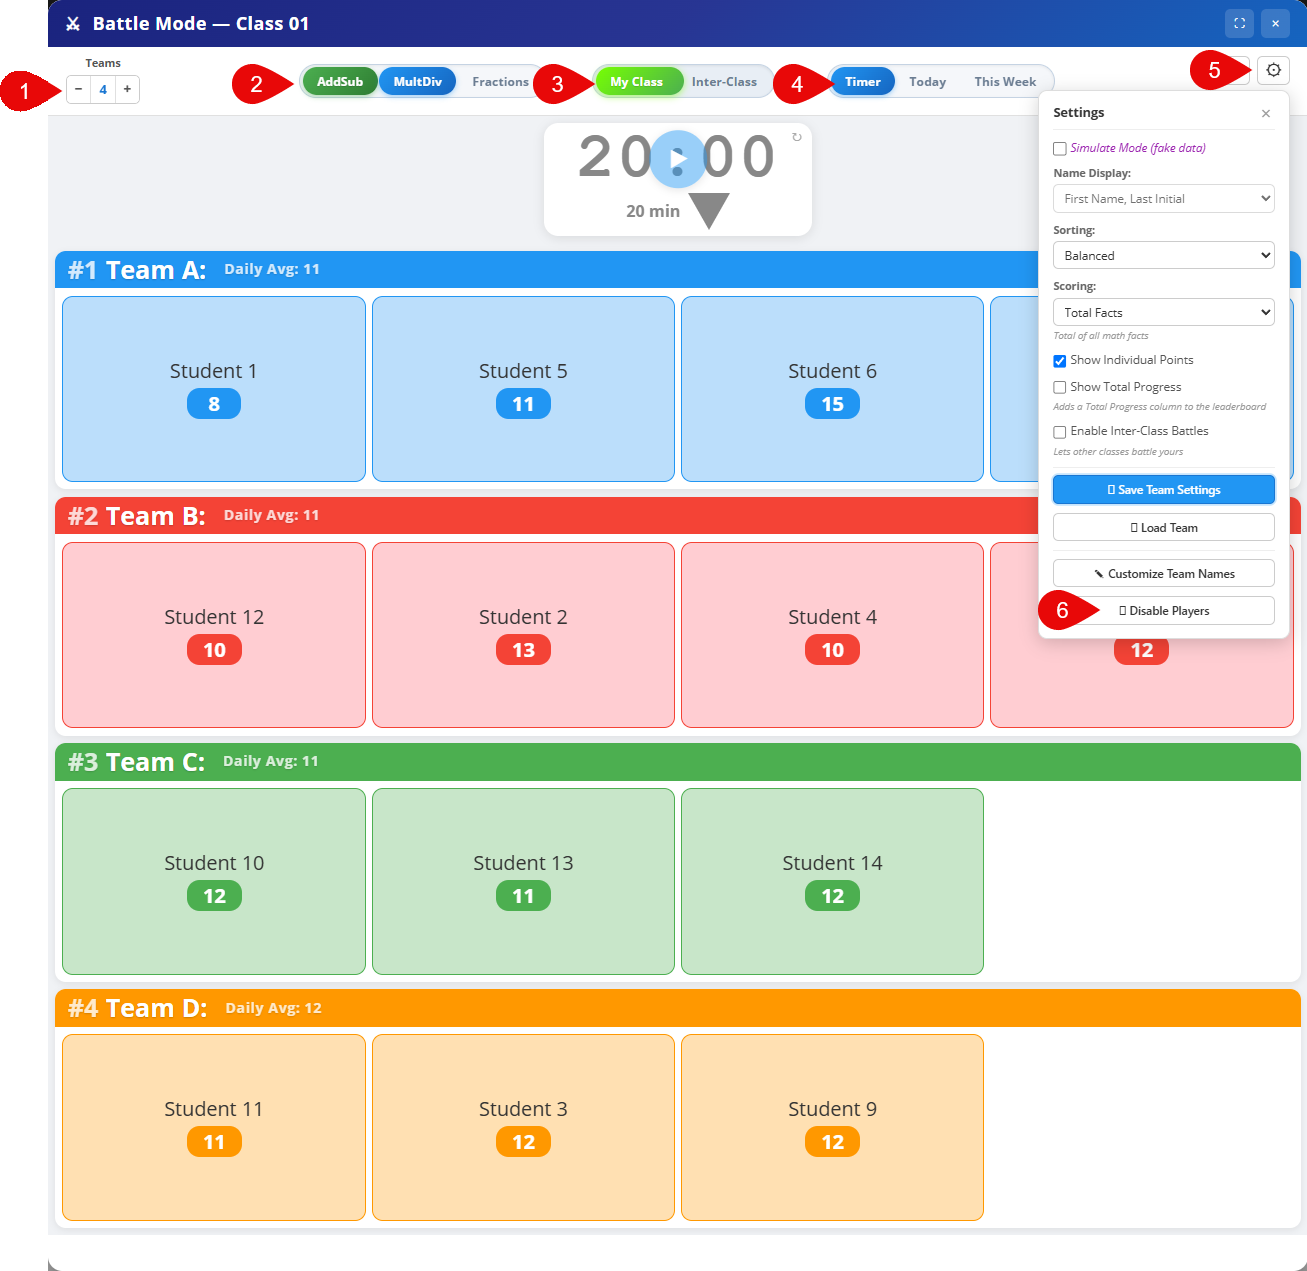
  1. Set the number of teams. By default, it makes the teams as even as it can.
  2. Choose which curricula count in the battle.
  3. Battle within your own class, or against other classes.
  4. Race a timer, or battle across a whole day or week.
  5. Click Settings for advanced features.
  6. Hide absent students with Disable Players.
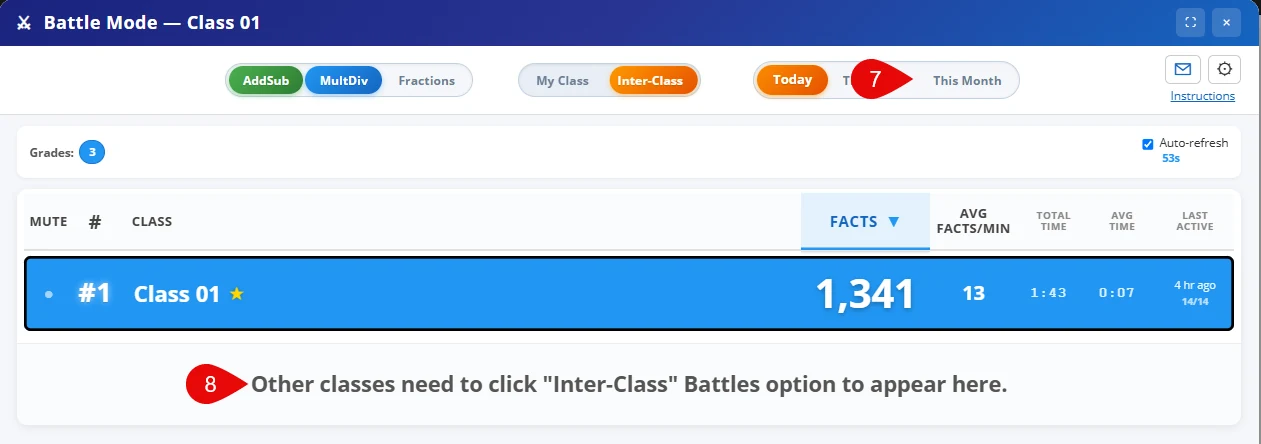
  7. Inter-Class battles can run for a whole month.
  8. Other classes only appear once they turn on Inter-Class battles themselves. An Admin can also turn it on for them.
Battle Mode with four teams, numbered 1 to 6: teams, curricula, my class or inter-class, timer or day or week, settings, and disable players

A class split into four teams, racing a 20-minute timer.

Inter-Class Battle Mode, numbered 7 and 8: the This Month option, and the note that other classes must turn on Inter-Class battles

An Inter-Class leaderboard, ranked by total facts.

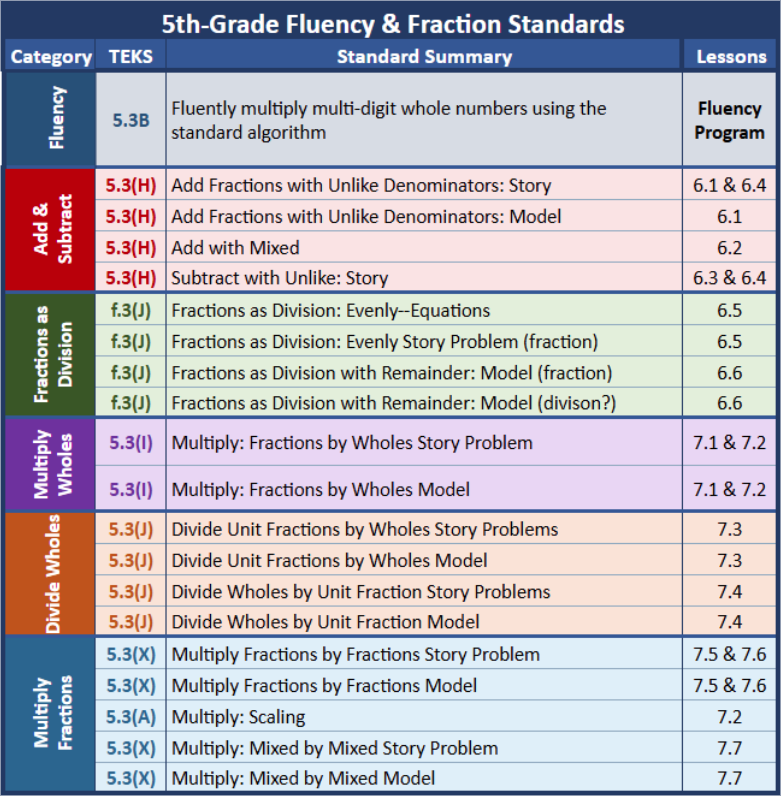
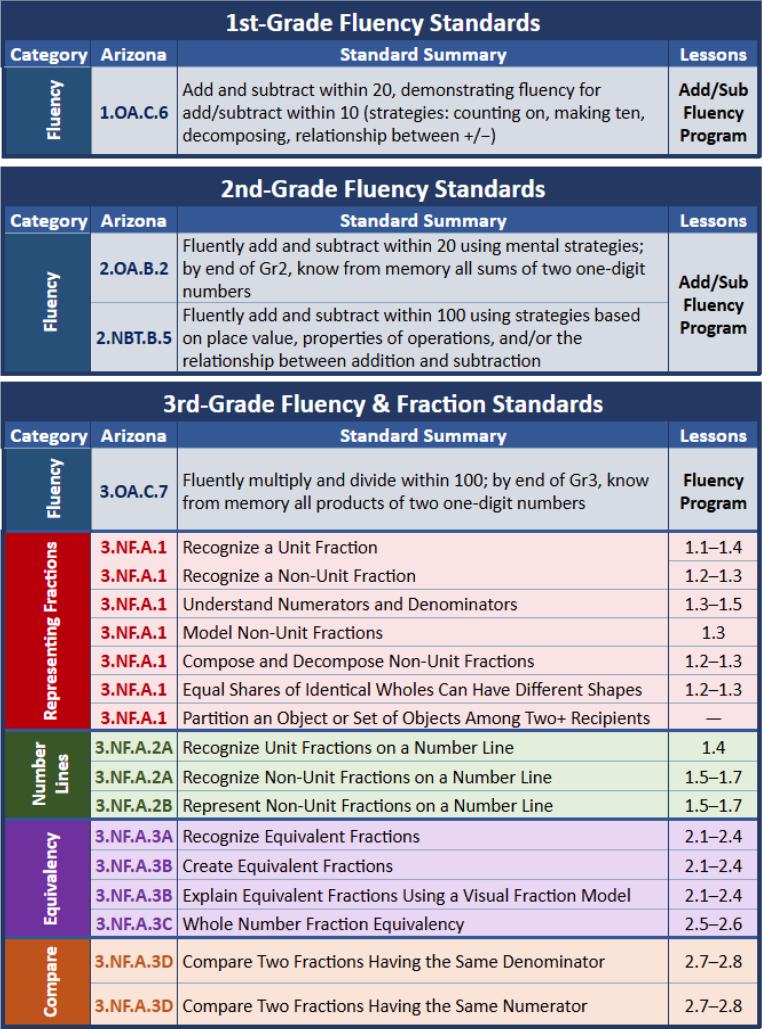
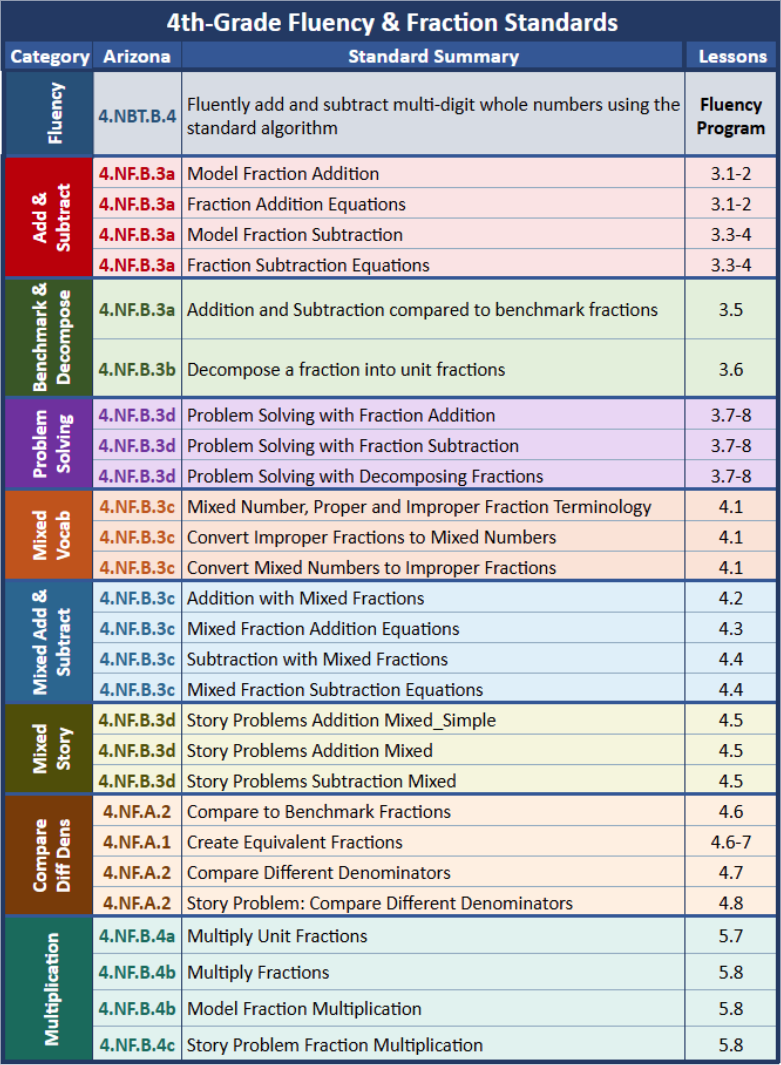
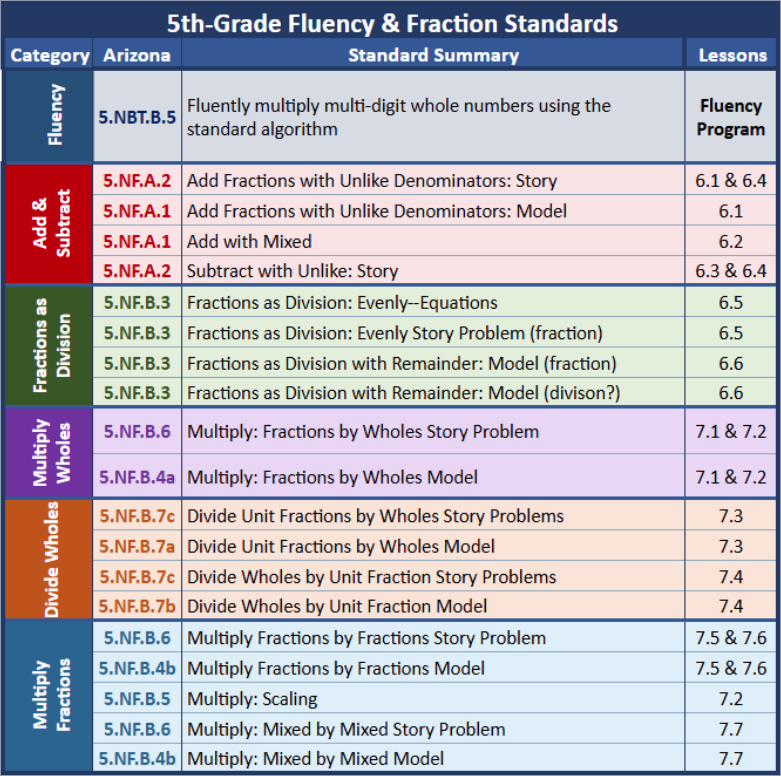
Standards & research

The evidence behind the program, and exactly which standards it covers in your state.

Standards coverage — visual summaries

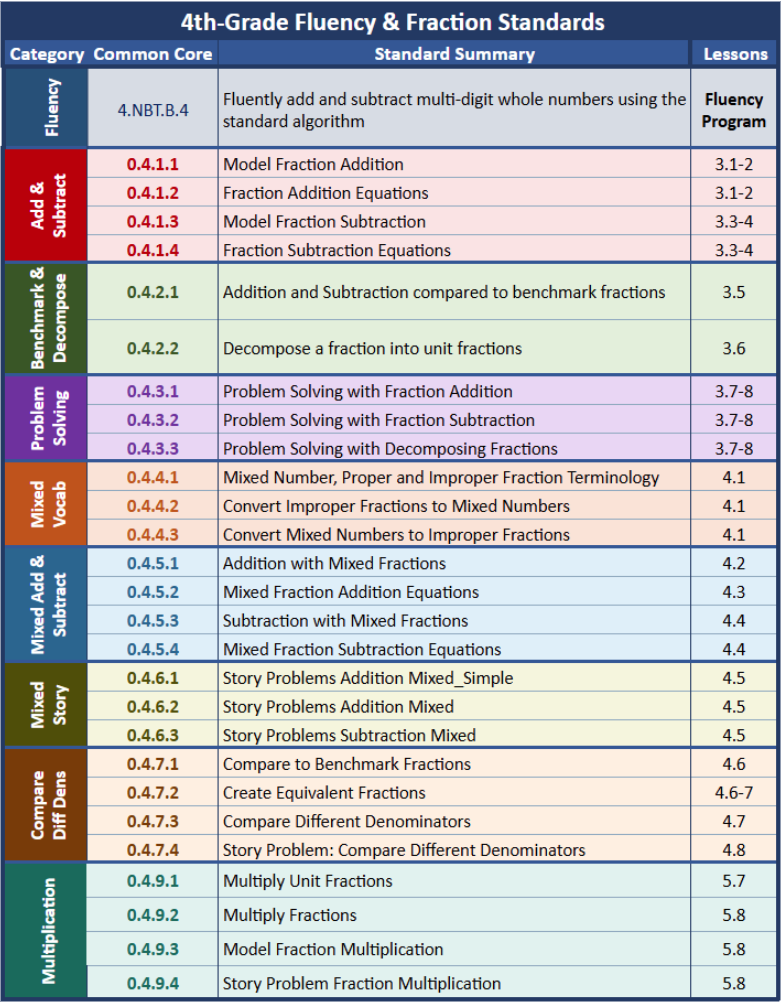
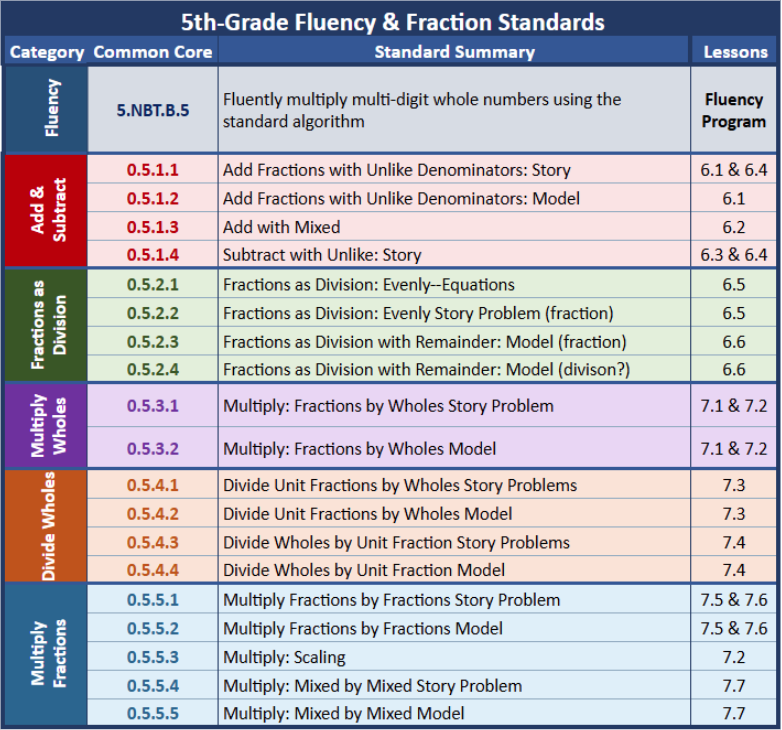
Common Core coverage

Every Common Core fraction standard we cover, by grade band. Click any chart to open it full size.

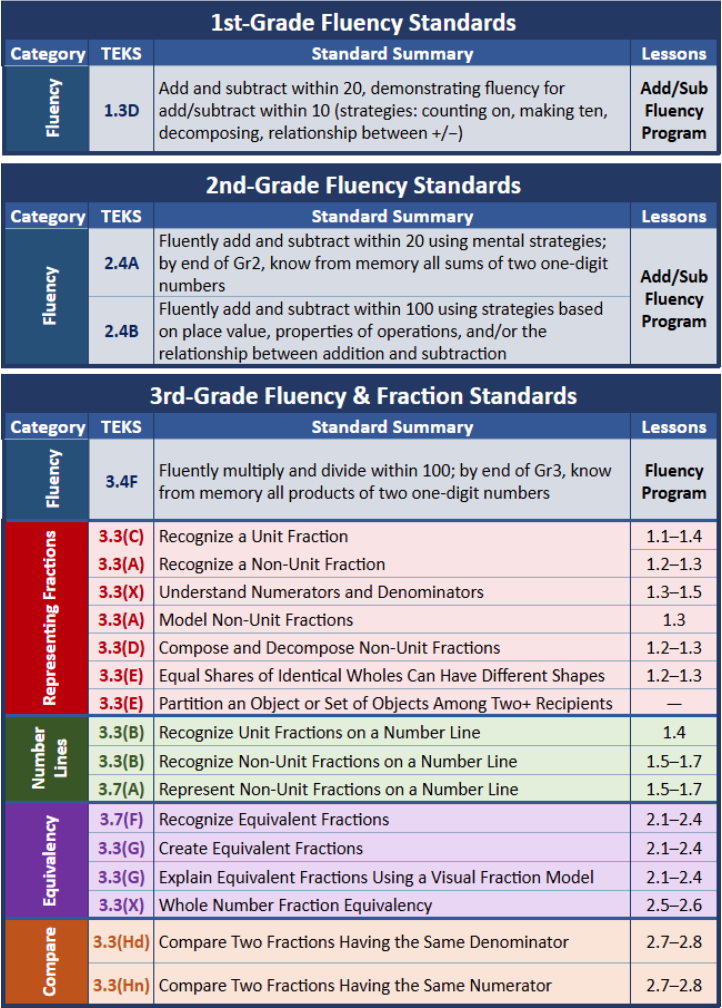
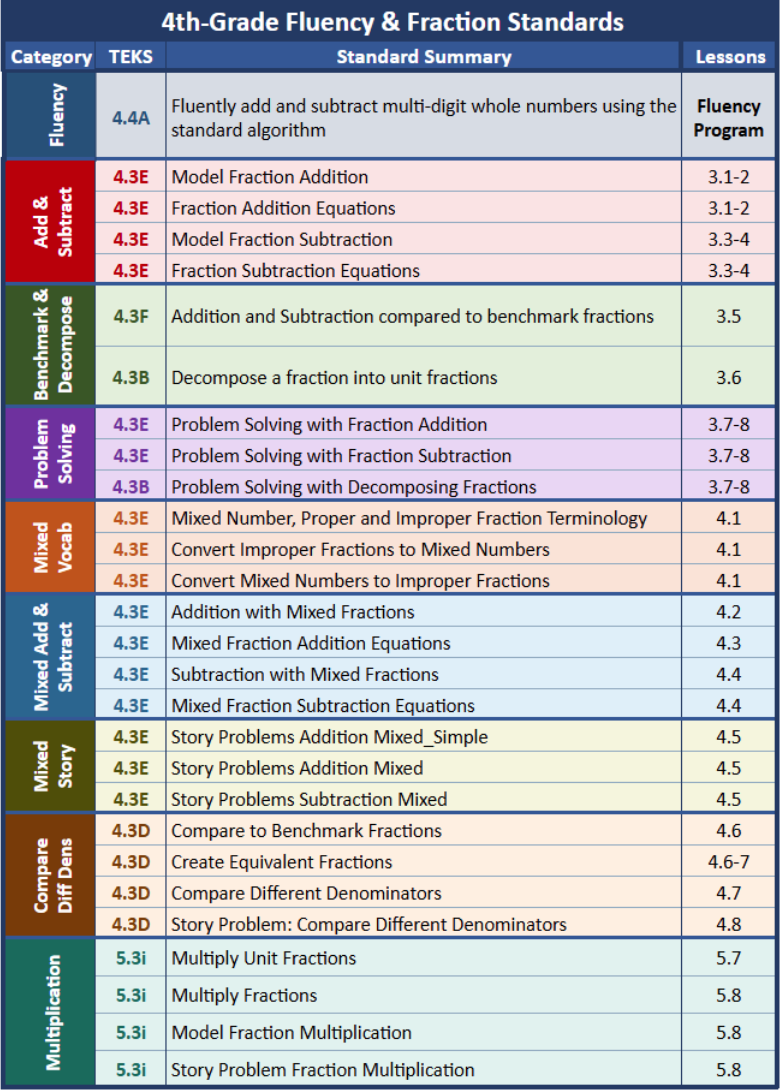
TEKS coverage (Texas)

Every TEKS fraction standard we cover, by grade band. Click any chart to open it full size.

Arizona coverage

Every Arizona fraction standard we cover, by grade band. Click any chart to open it full size.

Detail

Which grades are covered today?

We currently cover the Common Core and TEKS fraction standards for 3rd grade and have started rolling out content for 4th grade. 5th grade will follow shortly after.

We have been rather stunned by our initial research results. Nearly all of the students we have assessed so far have shown a tremendous need to review these foundational fractions concepts. As a result we are very eager to help students truly master them, so they will be prepared as soon as our additional curriculum becomes available.

Randomized study results

Read the randomized study research results: Whitepaper (PDF).

Tech requirements

EdTech Fractions is a full 3D game that runs right in the browser. Here is the short list of what it needs.

Getting us through your network filter District IT

EdTech Fractions is a real 3D game — a full game engine running right inside the browser, with no install and no plugin. That is what makes it land with students, and it is also why it asks a little more of a network than a plain text website does. Setting it up is short, and it is the same for every district.

Allow these

Our addressesWildcards, if your filter takes them.
  • *.edtechgames.com
  • *.mathfluencyassessment.org
  • edtechgames.s3.amazonaws.com
  • edtechgames.s3.us-east-1.amazonaws.com

The two Amazon addresses are where student progress is saved. If your filter only takes S3 as a wildcard, *.s3.amazonaws.com and *.s3.us-east-1.amazonaws.com work just as well.

If your filter does not take wildcardsThese replace the two starred lines above. The Amazon addresses are already exact.
  • login.edtechgames.com
  • edtechgames.com
  • reports.edtechgames.com
  • manager.edtechgames.com
  • app.mathfluencyassessment.org
  • mathfluencyassessment.org

Teachers and administrators use manager.edtechgames.com to roster and manage classes. Students never touch it.

Shared web servicesFonts, icons and script libraries. Most districts already allow every one of these.
  • ajax.googleapis.com
  • fonts.googleapis.com
  • fonts.gstatic.com
  • use.fontawesome.com
  • cdn.ckeditor.com
  • www.google.com
  • texttospeech.googleapis.com

The last one is what reads questions and instructions aloud to students.

One step is easy to miss: turn SSL/TLS inspection off for these addresses.

Allowing the domain on its own is often not enough. Every case we have tracked down came back to the inspection step, and switching it off for our addresses fixed it.

Two quick things

Our name has “games” in it. Category filters sometimes catch us in a Games rule even after the addresses are allowed, so it is worth a glance.

Filtering the iOS or Android app too? Same addresses, nothing extra.

Still not working? Hand it to us

The error screen shows a support code such as BOOT-0821-1733. Send that to support@edtechgames.com and we can look up exactly what that device ran into. You do not have to work it out yourself.

Two things that occasionally help in the meantime. On a heavily restricted network, one extra address sometimes needs allowing: uo60u7qc7h.execute-api.us-east-1.amazonaws.com.

And if you want to confirm a filter is in the path, requests to login.edtechgames.com usually carry the filter’s own hostname in the via or x-cache header — something like cn-864970116-vnsg13224.ibosscloud.com.

Devices and browsers District IT

It is a 3D game, but it is built for the hardware schools actually have — budget Chromebooks included. If a device is from the last decade, it almost certainly runs it.

Chromebooks and computers
  • Chrome 72 or newer.
  • Graphics acceleration switched on. It is on by default and almost never off.
  • The slowest Chromebook we have tested, a Lenovo N22, plays it fine.
iPad and iPhone
  • iOS 11 or newer.
  • That covers iPad 5 and newer, iPad Air and newer, and iPad Mini 2 and newer — so anything from 2013 on.
Android
  • Samsung Galaxy Tab S3 or newer, and equivalent tablets.

Not sure about a particular model? Send it to support@edtechgames.com and we will tell you.

FAQ

Pacing, scheduling, the pre-test, and how the program behaves over a term.

How much usage do you recommend, and how long does it take?

20 minutes a day for two or three months is the ideal, because momentum helps. But many schools only have 10 minutes a day, and that works just fine — you just have to maintain the consistent schedule for longer.

Scheduling is the single biggest predictor of results. The program will do remarkable things for your students, but only if it consistently gets into the schedule.

Your students will all need wildly different amounts of time to finish. Your fastest finishers will be done in a week or two, while your struggling students will need to lock in for a very long time.

That is why it is so important to establish a culture where students are giving it their very best effort, and have mountains of encouragement and support.

The graphs below show it. Each colour is a group of students — the fastest 20%, the next 20%, and so on — and you can watch each group work its way across the hours. The slowest 20% is split four ways, because those students spread out enormously.

What if the pre-test is too hard?

Student pre-tests can be very sensitive, so we’ve given you lots of tools to adjust them to the specific needs of your student(s).

Four ways to help:

1. Help them understand why it’s hard

The pre-test is not checking whether a student can get a fact correct, if given sufficient time. It is finding the facts they already know automatically, so the program can skip those and spend the student’s time on the rest.

  • Facts & Fracts gives students roughly double the time required for automaticity, so that we can also detect facts that are even close to being automatic.
  • It ends itself. As soon as it has worked out which facts the student can skip, it stops and sends them into the game.

Tell students before they start: it is supposed to go fast, and nobody is expected to know them all.

2. Students stop it themselves

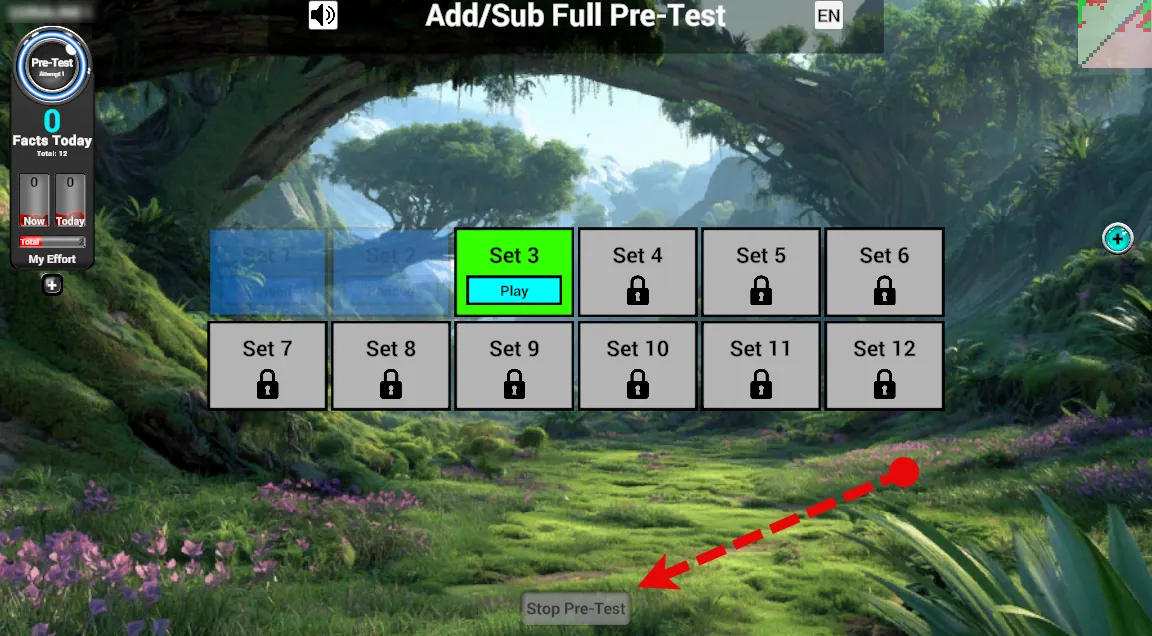
Once a student starts missing facts, a Stop Pre-Test button appears at the bottom of the screen. If they would rather not keep going, they can click it and go straight to playing instead of waiting for the pre-test to end on its own.

The Stop Pre-Test button at the bottom of the pre-test screen

The Stop Pre-Test button, below the sets. Click to enlarge.

3. Turn the pre-test off

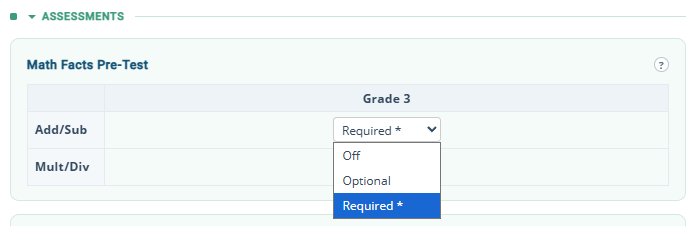
If the pre-test itself stresses a student out, you do not have to require it. In your reports, select the student, go to Menu → Settings → Assessments, and change Math Facts Pre-Test from Required to Off or Optional.

Settings, Assessments: Math Facts Pre-Test set to Off, Optional or Required

One setting per operation: Add/Sub and Mult/Div.

4. Give them more time with the MathFluencyAssessment.org benchmark

The pre-test answers “which facts are automatic?” If you also want to know “which facts can they get right when given plenty of time?”, switch on the Extra benchmark at MathFluencyAssessment.org.

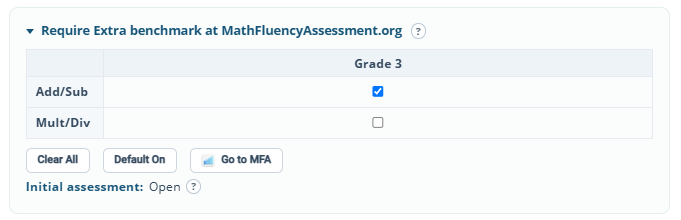
It gives students up to 12 seconds per fact and takes about 5 to 10 minutes. It lives in the same place — Menu → Settings → Assessments — as a checkbox for each operation. Uncheck it to switch it back off.

Settings, Assessments: Require Extra benchmark at MathFluencyAssessment.org, with a checkbox for Add/Sub and Mult/Div

Checked for Add/Sub, unchecked for Mult/Div.

When in the year should we start?

We recommend starting 4th grade and higher immediately. Our research shows they are usually lacking significant fluency and confidence with the most basic fractions concepts. Starting early gives even your struggling students time to master these prerequisite skills before you try to teach them new concepts.

What are Ninja and Ninja Master?

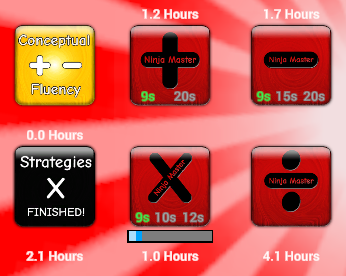
Ninja and Ninja Master are additional difficulty levels built for students who are extremely high-achieving.

Students start to unlock these as they completely pass off individual operations, but they cannot actually play any of them until they have completely passed off all operations at their normal level of difficulty.

  • Ninja is very hard. It cuts their total response time down to two seconds.
  • Ninja Master is insanely hard. It allows a single second in total, so only a handful of students in the entire country pass it each year.
  • Neither should ever be required. They are optional, for fun, for students successful enough to unlock them.
  • These are rare and advanced enough that progress does not yet appear in the reports. For now you have to look at the student’s game screen.
Ninja mode

Troubleshooting

Graphics, drivers and hardware acceleration — the failures that stop the game from rendering.

SwiftShader error District IT

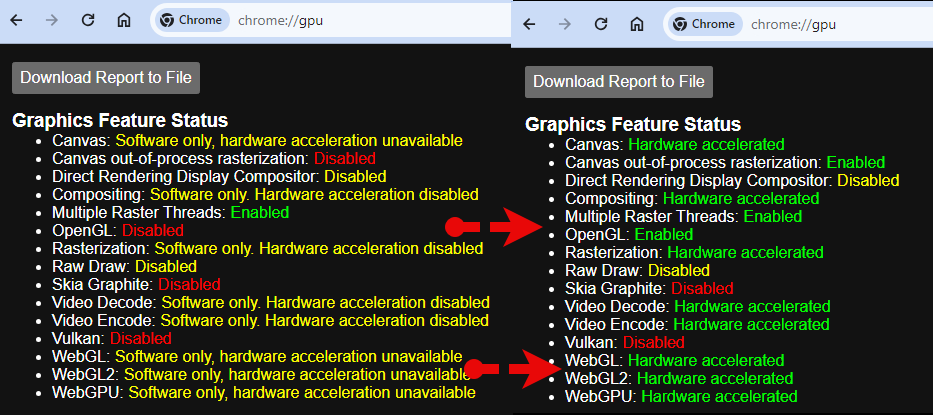
If your device is detected using SwiftShader, that usually means Chrome has been set to disable hardware acceleration. It is incredibly rare for this to be disabled these days, but it is possible. Sometimes the student can change the setting directly; often you will need IT to re-enable hardware acceleration.

If you cannot re-enable it quickly, you can sometimes work around it by switching from Chrome to Edge — assuming it is not also disabled there.

To check the setting, copy and paste this into a Chrome tab on the device. You cannot click it: chrome://gpu

Hardware acceleration check in chrome://gpu

On a Chromebook, these instructions appear to be current.

On a desktop or laptop

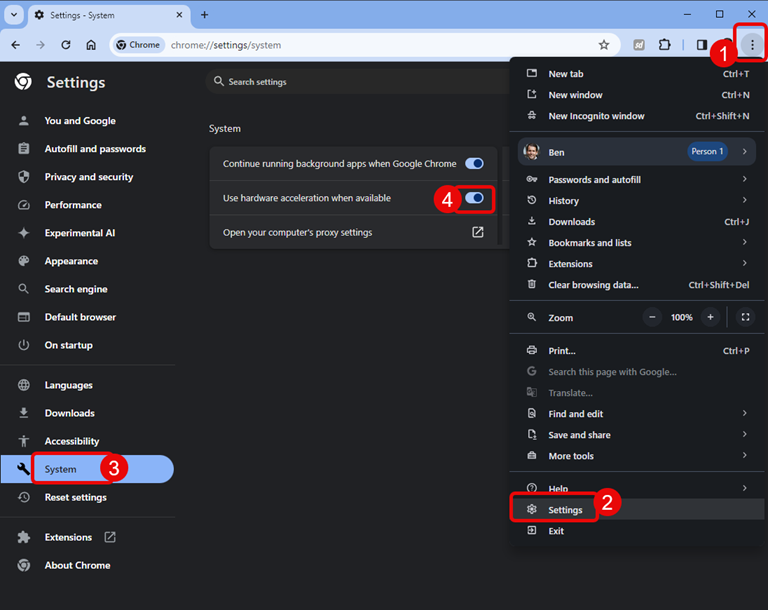
  1. From the upper-right corner of Chrome, click the three dots icon.
  2. Select Settings, then System.
  3. Enable Use hardware acceleration when available. Enable hardware acceleration in Chrome settings

Advanced

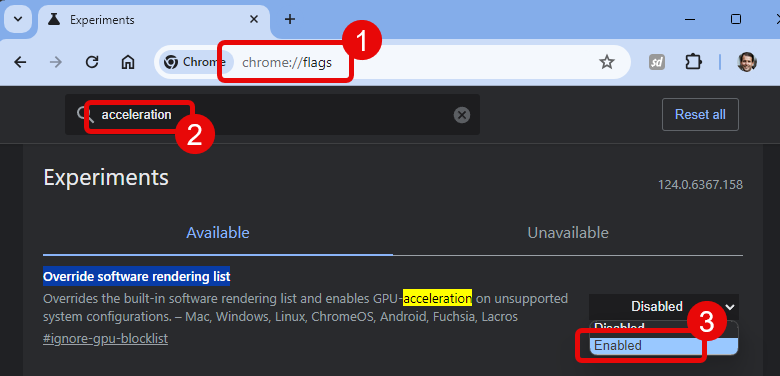
We have seen cases where even setting that value does not let the device use GPU acceleration. In rare cases you may need to go to chrome://flags, search for “acceleration” and enable Override software rendering list.

Chrome flags: override software rendering list

Needing that flag is a symptom, not a fix. If you have to set it, the device’s graphics driver is usually corrupted. Reinstalling the driver is a much better solution.

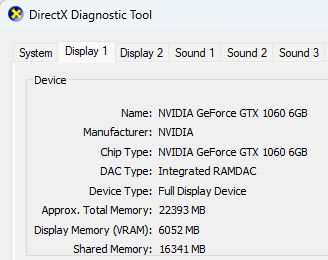
To see which graphics processor the device has, press the Windows key, type dxdiag and launch dxdiag.exe. Click the Display tab to find the Name of the GPU, then find and install the correct driver. In nearly all cases this should be done by your IT person.

DXDiag display tab

Microsoft Basic Render Driver District IT

If the device ends up using the “Microsoft Basic Render Driver,” it means it cannot find or cannot use the correct driver. Performance will likely be poor. The fix is to identify the graphics card the device actually has and install the correct driver for it.

Press the Windows key, type dxdiag and launch dxdiag.exe. Click the Display tab to find the Name of the GPU, then find and install the correct driver. In nearly all cases this should be done by your IT person — it would be unusual for students to have access to these settings.

DXDiag display tab

Reporting a bug

We are not currently aware of any bugs in the game. If you find one, please use the in-game bug reporter and send us as much information about it as you can. Thank you.

Still stuck? Tell us what you are seeing and a real person will answer.

Email support